Forums > Digital Art and Retouching > 
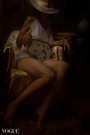
How Can I Achieve the Adele Vogue look?

Photographer

Joey B Studio

Posts: 3

Covington, Georgia, US

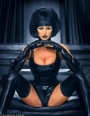
Hey everyone, I was just wondering if anyone knew how to achieve the Adele Vogue look or something similar in post processing. thanks.
https://pleasantriesandpitbulls.files.wordpress.com/2012/02/adele-0312-2-vo-frnt49_200724771756.jpg

Aug 19 12 06:46 pm Link

Photographer

Random Shutter Clicks

Posts: 4114

PORTER CORNERS, New York, US

What "look" do you mean?

Aug 19 12 06:51 pm Link

Photographer

Joey B Studio

Posts: 3

Covington, Georgia, US

The color in the photo. Is there a particular action i have to use?

Aug 19 12 06:55 pm Link

Retoucher

Peano

Posts: 4106

Lynchburg, Virginia, US

I think the main color adjustment is something like this.

https://img831.imageshack.us/img831/4487/blue2r.jpg

Aug 19 12 07:10 pm Link

Photographer

Ken Marcus Studios

Posts: 9421

Las Vegas, Nevada, US

Lighting !

Aug 19 12 07:15 pm Link

Photographer

Carlos Ignacio M

Posts: 21

Houston, Texas, US

Either a 20 inch reflector or beauty dish as a key, main light. There should not be a fill light or reflector lighting up the shadows on the opposite side. The model should be at a distance from the backdrop so there is no spill. Flags must be used so the background lighting does not spill on to the model.

Aug 19 12 07:25 pm Link

Photographer

William Kious

Posts: 8842

Delphos, Ohio, US

First, you need Adele, a stellar hair stylist and an uber MUA.

Then, some paper for your backdrop.

This looks like it might have been a single, large softbox high and to the right (photographer's right.) Some bounce for fill. Expose as necessary.

In post, retouch any blemishes, etc. Perhaps a bit of liquefy to bring her waist in (there's no way that corset was slimming her quite that much.) A bit of carving, etc.

Finally, a curve layer to boost the blues in the shadows.

Aug 19 12 07:29 pm Link

Photographer

M Pandolfo Photography

Posts: 12117

Tampa, Florida, US

Carlos Ignacio M wrote:
Either a 20 inch reflector or beauty dish as a key, main light. There should not be a fill light or reflector lighting up the shadows on the opposite side. The model should be at a distance from the backdrop so there is no spill. Flags must be used so the background lighting does not spill on to the model.

I could be wrong but I think the OP doesn't want to know about lighting. Ewww. He wants to know how he can recreate it in Photoshop. I think CS7 will have an Instagram filter which will please so many.

I didn't even know this was "a look." I just thought it was a little heavy toward the blue range.

Aug 19 12 07:30 pm Link

Retoucher

Peano

Posts: 4106

Lynchburg, Virginia, US

To unpack the color, check RGB values in the highlights, midtones, and shadows. It seems to be pretty straightforward:

- Highlights are neutral: 242.242.242

- Midtones (assuming the background was neutral) are high in blue: 122.124.132

- Shadows are even higher in blue: 2.4.30

These are consistent with pulling the shadow end of the blue curve upward, as I noted earlier.

https://img11.imageshack.us/img11/4861/rgbeb.jpg

Aug 19 12 07:58 pm Link

Photographer

Joey B Studio

Posts: 3

Covington, Georgia, US

thanks everyone for the feedback! will try out some of your suggestions.

Aug 19 12 09:57 pm Link

Photographer

eybdoog

Posts: 2647

New York, New York, US

I know you want to do this in post, but Ken is spot on with his comment of lighting. Keep things simple and shoot it in camera vs. having to rely on post. You can get this with the right experience lighting your subject, and then set your camera WB to around 4200k and adjust to your desired taste to get the blue tones. It will save you hours of wasted work flow in post trying to create a "look" that can be shot in a quarter of the time from the get go. Good luck

Aug 19 12 10:04 pm Link

Retoucher

Peano

Posts: 4106

Lynchburg, Virginia, US

Charlie-CNP wrote:
I know you want to do this in post, but Ken is spot on with his comment of lighting. Keep things simple and shoot it in camera vs. having to rely on post. You can get this with the right experience lighting your subject, and then set your camera WB to around 4200k and adjust to your desired taste to get the blue tones. It will save you hours of wasted work flow in post trying to create a "look" that can be shot in a quarter of the time from the get go. Good luck

Two points:

1. The OP specifically asked how to get the effect in post. Explaining how to do it in the studio doesn't address his question.

2. It doesn't require "hours" of work in post; more like a few seconds. If the picture has already been shot it's hardly "wasted" work to take a few seconds to add a blue cast to the shadows and midtones.

Aug 19 12 11:14 pm Link

Photographer

Rich Burroughs

Posts: 3259

Portland, Oregon, US

Charlie-CNP wrote:
I know you want to do this in post, but Ken is spot on with his comment of lighting. Keep things simple and shoot it in camera vs. having to rely on post. You can get this with the right experience lighting your subject, and then set your camera WB to around 4200k and adjust to your desired taste to get the blue tones. It will save you hours of wasted work flow in post trying to create a "look" that can be shot in a quarter of the time from the get go. Good luck

If the blue came from the lighting, wouldn't the highlights be more blue too?

Changing the color temperature of the light doesn't seem to me like it would achieve the same things that you can do with things like split toning or messing with the color curves. Which people do a lot in post.

Aug 19 12 11:34 pm Link

Photographer

Neil Snape

Posts: 9474

Paris, Île-de-France, France

If it is just about the color or color grading to steal motion picture terms, you can do this in Photoshop or LR or most other raw developers.

As stated above take the blue channel end point and set it to higher than 0. Then play in the other channels, until you have the contrast brightness you are looking for.

It is her though that makes the picture stunning, the technique by itself is yawn.

I use this technique when the picture is less than stellar to make it that way, and because so many people are doing the same.

For a few images just to stay trendy it's okay, but not more.

Here is one done that way yet outdoors.

https://photos.modelmayhem.com/photos/120627/12/4feb5a2c07f7e_m.jpg

Aug 19 12 11:45 pm Link

Photographer

Oscar Partida

Posts: 732

Palm Springs, California, US

i agree with Peano and Neil Snape,pull the blue channel

Aug 20 12 12:52 am Link

Photographer

The Full Frame

Posts: 121

Birmingham, England, United Kingdom

Peano wrote:
To unpack the color, check RGB values in the highlights, midtones, and shadows. It seems to be pretty straightforward:

- Highlights are neutral: 242.242.242

- Midtones (assuming the background was neutral) are high in blue: 122.124.132

- Shadows are even higher in blue: 2.4.30

These are consistent with pulling the shadow end of the blue curve upward, as I noted earlier.

https://img11.imageshack.us/img11/4861/rgbeb.jpg

Peano, you should have a standard template you can cut and paste for the number of times you've explained this lol  you are a persistent helper. smile

M,

Aug 20 12 06:08 pm Link

Photographer

WIP

Posts: 15973

Cheltenham, England, United Kingdom

Carlos Ignacio M wrote:
Either a 20 inch reflector or beauty dish as a key, main light. There should not be a fill light or reflector lighting up the shadows on the opposite side. The model should be at a distance from the backdrop so there is no spill. Flags must be used so the background lighting does not spill on to the model.

Short light.

Aug 21 12 04:37 am Link

Retoucher

Peano

Posts: 4106

Lynchburg, Virginia, US

The Full Frame wrote:
Peano, you should have a standard template you can cut and paste for the number of times you've explained this lol

I do! smile But in this case I needed to show the values for this particular image. Otherwise, I just paste in the links to the other cross-processing posts.

Aug 21 12 05:03 am Link

Photographer

ShutterSnaps

Posts: 1330

Leeds, England, United Kingdom

William Kious wrote:
*snip*
. Perhaps a bit of liquefy to bring her waist in (there's no way that corset was slimming her quite that much.) A bit of carving, etc.

We cant even see her waist! She looks about normal to me.

Aug 21 12 10:37 am Link

Photographer

NothingIsRealButTheGirl

Posts: 35726

Los Angeles, California, US

Hairflicksmodelphotog wrote:

We cant even see her waist! She looks about normal to me.

Sure you can. Look at the original post.

Aug 21 12 11:12 am Link

Photographer

_volt_

Posts: 4

Manila, National Capital Region, Philippines

Neil Snape wrote:
Here is one done that way yet outdoors.

https://photos.modelmayhem.com/photos/120627/12/4feb5a2c07f7e_m.jpg

hi neil, i get that you boost the blue channel in the shadow areas- but how do you bring back the skin color to rich brown to golden? sometimes i see cross-processed photos like this with green/cyanish tint, i still am wondering how you guys do that. smile

Oct 14 12 03:28 pm Link

Retoucher

Peano

Posts: 4106

Lynchburg, Virginia, US

_volt_ wrote:
hi neil, i get that you boost the blue channel in the shadow areas- but how do you bring back the skin color to rich brown to golden?

Layer mask.

Oct 14 12 08:25 pm Link

Retoucher

CS Toledo

Posts: 419

Manila, National Capital Region, Philippines

_volt_ wrote:

hi neil, i get that you boost the blue channel in the shadow areas- but how do you bring back the skin color to rich brown to golden? sometimes i see cross-processed photos like this with green/cyanish tint, i still am wondering how you guys do that. smile

Maybe you can try tweaking the dark tones via Selective Color by lowering the Yellow values under Colors>Blacks? You would probably want to mess with Colors>Neutrals a little bit too... but just add salt and pepper to taste.

Oct 14 12 08:49 pm Link

Photographer

Quay Lude

Posts: 6386

Madison, Wisconsin, US

Ken Marcus Studios wrote:
Lighting !

Is that all? Are you sure about that, Ken?

Oct 14 12 08:58 pm Link

Photographer

Dan OMell

Posts: 1415

Charlotte, North Carolina, US

the post-processing question was cleared up in 1001st time

this is the video of the session:
http://www.youtube.com/watch?v=8qwKJwttqW8
some of the lights definitely has a blue gel (not in this particular frame),
but it does not mean the final image wasn't tweaked some more in the post

she looks much skinnier in the photo

Oct 14 12 10:45 pm Link

Photographer

_volt_

Posts: 4

Manila, National Capital Region, Philippines

Dan OMell wrote:
the post-processing question was cleared up in 1001st time

this is the video of the session:
http://www.youtube.com/watch?v=8qwKJwttqW8

she looks much skinnier in the photo

Dan, the video looks color graded too. 

So, there really isn't a general curve tweak to do the color shift (eg cyan sky) whilst making the model's skin color reasonable?

Thanks for answering guys.

Oct 15 12 12:23 pm Link

Photographer

Dan OMell

Posts: 1415

Charlotte, North Carolina, US

_volt_ wrote:
So, there really isn't a general curve tweak to do the color shift (eg cyan sky) whilst making the model's skin color reasonable?

it depends on how dramatic your tweaking is, probably. to keep the skin tones reasonable, you always can use masking, after all

personally, I prefer a hand tool in the curves adjustment layer using one of the 3 color channels individually. it is much more precise, and you can always adjust skin tones later, after tweaking some other areas, for example shadows. etc.
very powerful thing.

was lazy to capture  my own snapshots and found the generic one for the combined RGB:
https://laurashoe.com/wp-content/uploads/2010/01/ps-tat-curves1.jpg

Oct 15 12 12:59 pm Link

Retoucher

Megan E Griscom

Posts: 525

Bordentown, New Jersey, US

Peano wrote:
To unpack the color, check RGB values in the highlights, midtones, and shadows. It seems to be pretty straightforward:

- Highlights are neutral: 242.242.242

- Midtones (assuming the background was neutral) are high in blue: 122.124.132

- Shadows are even higher in blue: 2.4.30

These are consistent with pulling the shadow end of the blue curve upward, as I noted earlier.

Can you tell me on what tool can you adjust the midtones, etc. I added a color balance layer but that wasnt it. Im still learning Photoshop and there always seems to something I cant figure out. Your profile said to email you but I couldnt find your email listed. You can email me at [email protected] if you wouldnt mind.

Thanks!

Nov 16 12 05:53 pm Link

Retoucher

Peano

Posts: 4106

Lynchburg, Virginia, US

Megan E Griscom wrote:
Can you tell me on what tool can you adjust the midtones, etc.

Try curves. Use the targeted adjustment tool for the midtones.

EDIT: I doubt if you even need that. In the original target image, the color adjustment was probably as simple as this:

https://img560.imageshack.us/img560/5995/bluen.jpg

Nov 16 12 07:00 pm Link

Photographer

Gulag

Posts: 1253

Atlanta, Georgia, US

Megan E Griscom wrote:
Can you tell me on what tool can you adjust the midtones, etc. I added a color balance layer but that wasnt it.

using a midtone mask can help.

Nov 16 12 07:02 pm Link

Photographer

Eridu

Posts: 623

Boston, Massachusetts, US

Michael Pandolfo wrote:

I could be wrong but I think the OP doesn't want to know about lighting. Ewww. He wants to know how he can recreate it in Photoshop. I think CS7 will have an Instagram filter which will please so many.

I didn't even know this was "a look." I just thought it was a little heavy toward the blue range.

That^^^

Nov 16 12 08:09 pm Link

Photographer

Paul Ferradas

Posts: 113

San Jose, California, US

Cool topic... Thanks for your info Peano. One question I have is not the color but the actual shot itself. As you know digital cameras can be tack sharp but if you notice this image there's a certain degrade to it. I can't quiet spell it out but it's looks rather soft, or is it grain? Almost looks scanned, blurred, faded? Just by adjusting color you won't get this LOOK? What else is going on to the image?

Nov 19 12 05:34 pm Link

Photographer

Paul Ferradas

Posts: 113

San Jose, California, US

And not being able to subscribe to this post unless I pay is BS!

Nov 19 12 05:37 pm Link

Photographer

richy01

Posts: 153

Amsterdam, Noord-Holland, Netherlands

Paul Ferradas wrote:
And not being able to subscribe to this post unless I pay is BS!

Just save it as a bookmark...

Nov 20 12 05:11 am Link

Photographer

Daniele Burza

Posts: 18

Milan, Lombardy, Italy

am i wrong, or is denoised "more than a bit" (with a later add % virtual noise for a bit of depth)? i ask this, because it's the only thing i know to render a picture more cgish-cartoonish-painterly-putyourpreferrednamehere, beside a little help with dnb and tonemapping can give.

Dec 10 12 02:57 pm Link

Photographer

Daniele Burza

Posts: 18

Milan, Lombardy, Italy

Paul Ferradas wrote:
Cool topic... Thanks for your info Peano. One question I have is not the color but the actual shot itself. As you know digital cameras can be tack sharp but if you notice this image there's a certain degrade to it. I can't quiet spell it out but it's looks rather soft, or is it grain? Almost looks scanned, blurred, faded? Just by adjusting color you won't get this LOOK? What else is going on to the image?

that's what i think and sai in the previous comment, i think it's fully denoised, so what do you think?

Dec 11 12 04:01 am Link

Photographer

Andrew Rafalsky

Posts: 1

Kiev, Kiev, Ukraine

On this particular image the most part of color correction was certainly done during post production, and Peano gave a fairly clear explanation of how to do it.

As for the softness, the shooting was done using a medium format camera, it has a little bit different picture; maybe a soft filter was used, but I'm pretty sure It's just a good post production work.

Dec 11 12 01:58 pm Link

Retoucher

Megan E Griscom

Posts: 525

Bordentown, New Jersey, US

I've been playing around with several images since this post was placed, trying to achieve the color. I chose an image with a nuetral background, a model with similar coloring, etc.

Bringing the blue end of the curve help didnt achieve anything close to the vogue look. It just made everything blue.

When you say 'unpack color' what do you mean? or colors>nuetrals? waht does that mean. The values noted from peanos post where are they found at?

Jan 07 13 11:48 am Link

Retoucher

Peano

Posts: 4106

Lynchburg, Virginia, US

Megan E Griscom wrote:
When you say 'unpack color' what do you mean?

Measure the RGB values for the darkest shadows, the midtones, and the brightest highlights.

or colors>nuetrals? waht does that mean.

It means the RGB values are equal. R = G = B. Doesn't matter what the numbers are. If they're the same, that's a neutral tone. They all live along the left edge of the color picker:

https://i1005.photobucket.com/albums/af171/retouch46/Forums/neutral_zps03840d9a.gif

The values noted from peanos post where are they found at?

In the Info panel. You can just hover over an area with any tool, and the Info panel will show the RGB values. Or you can place sample points, and each one will have a fixed readout in the Info panel.

Jan 07 13 12:05 pm Link