|
Forums >
Digital Art and Retouching >
How to achieve this "not-sharp" look?
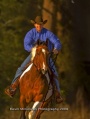
I've been at it for a while, but I can't seem to figure out how to get this type of look:  I'm shooting a band in a couple weeks, and they really want something like this. The closest I've been able to come to it is to shoot video and pull stills like these:   I'd have no problem using hot lights and shooting video, but 1080x1920 is just way too damn small which means I have to actually shoot stills. Would using hot lights and shooting with a relatively slow shutter speed yield the same results or is this something I'm just gonna have to do in post? If I do have to do it in post, how would you recommend I go about it? Oct 10 12 10:19 am Link I'm not an expert in this and my advice is worth what you'll pay for it, but I recommend experimenting with an existing photo and vary the contrast (probably have to vary brightness as well). Oct 10 12 10:28 am Link Looks like high ISO film grain. Or older glass or both. Oct 10 12 10:30 am Link That first photo looks very much like film. Oct 10 12 10:37 am Link Tri-X film. Oct 10 12 10:38 am Link New Century Studio wrote: And it's pushed to around 3200 it looks like (which would make sense, although depending on stage lighting it may have been pushed to 1600). Oct 10 12 10:41 am Link Paramour Productions wrote: Agree on the film and pushing it. Oct 10 12 10:54 am Link Good Egg Productions wrote: +1. Oct 10 12 11:03 am Link Well the first one is definitely film since it was shot in the early 70s. Unfortunately, I don't shoot film, so it'll have to be on my 5DmkIII. Tri-X 400 is actually the base setting I use in ASE 3 when I'm converting to B&W. I'm actually pretty happy with how the second and third shot look (they were from some spontaneous video I shot with no regard towards lighting). It's just that they were video, not stills. So from what I'm gathering, aside from the grain, I'm gonna have to get this look in camera using hot lights and a slower, but not too slow shutter speed. That pretty much sum it up? Edit: Michael, I completely agree, and that's exactly what they want. I've had this shot of Dave Gilmour for a while that I keep meaning to blow up and get a print of. I showed it to them when we were talking about concepts, and they immediately said that's what they're looking for. Oct 10 12 11:06 am Link What I see in the first one is to use shallow DOF perhaps f/2 and ISO between 6400 and 12800. Oct 10 12 11:11 am Link I know it's not the critique forum but I do love that 2nd image...the shallow depth of field and the movement of the string-bending makes it. I think you're on the right track using ASE. You might want to go beyond the 400 and experiment with even higher ISO looks...or customizing the presets. Oct 10 12 11:11 am Link I use Capture One Pro to process my RAW files. As like other RAW converters there's a clarity slider that I've been playing with more lately, in an effort to not show every wrinkle in a portrait I've been running it in -40 range, it's also affecting the contrast some and I'm diggin' what it's giving. You might also try the lens blur filter in PS, be sure to click on the invert check box some and don't be afraid to use some film grain or Alien Skin plug-ins to get what your chasing. There are so many film replicators out there your bound to stumble on the right combo but to stay on production track, start now so your a leg up and you'll be able to know the basic post production your going to do while shooting it. GL- Look like a fun project. Oct 10 12 11:18 am Link Are you going to be in a studio setting (music or photo). Looks like a 3 light low key set to me. My guess is your editor will have an old film setting. IMOP Oct 10 12 11:31 am Link There are at least 5 visual characteristics in your original image that must be "duplicated or matched" so that your new image looks like the older image: 1.) The Highlights in the original image are clipped and burnt out. You are going to have to burn out the highlights in your new images...to match the look in your old image. 2.) Many Mid Grays are missing in the original image. There is a very limited range of mid grays in some places in your original image. There is NOT a "full range of grays" like you see in most modern day camera images. There is a limited tonality range in this image (a splotchy look... high contrast...with missing grays). There are many, many shades of gray that your modern digital camera will capture during your new shoot. If your new image has a full range of all grays in it...then it will be obvious that it Doesnt match the required stated original look. This original image was NOT shot with a modern, full range camera...it was shot on "film"! That film was pushed and over processed and over developed in the 60's...so that the original ISO 400 film would capture images in the dark theatrical environment. Push developing of the film gave it the apparent light gathering ability of an ISO 800 or ISO 1600 speed. This "Over Developing" of the film stock is responsible for much of the punchy, gritty, contrasty look you see. 3.) The Blacks are crushed... You will need to crush your blacks as well... to get the original LOOK! 4.) Overall blurryness to the image. It looks like the original camera was primarily focused on something else ...besides the performers face. Its easy to get out of focus images when someone is jumping around. You will need to produce a matching bluryness in your new images by mis-focusing your camera lens slightly...or by adding in a Lens Blur in Photoshop. 5.) "Excessive Film Grain" is evident throughout the entire image. This excessive grain was caused by over processing the film because theaters are usually very dark. You will need to Replicate this "Pushed Tri-x Film Grain Look" in your new images or they will not match the character of your original image. Each of these 5 individual characteristics must be matched up and replicated in Photoshop, Lightroom, or in the original camera and lighting. There may be more general characteristics that make up this kind of look. Note: There is one additional characteristic that you probably cant duplicate well in Photoshop. This visual characteristic must be done in-camera... by using matching location lighting. Notice the hot kicker side light... and the rear hair light in this picture! These auxiliary light sources are usually part of the stage lighting plot...and they add a definite white edge, and a visual glow, and an Edgy Kick to the image. That side kicker light... and the back hair lighting effect... are hard to replicate visually in Photoshop after the fact ...so you will need to create this edge lighting effect with actual location lighting during your new shoot. This hot edge look is best captured in camera. If you dont have lights in these kicker positions...then your new photo shoot will definitely NOT look hot and edgy like the original image. Here are some detailed Photoshop ways to create this look: For points #1 and #3: How you can you create that "Blowing out the Highlights" effect? Its most generally done with a curves adjustment layer. You can adjust the top right part of a curve to create a Burned-Out Highlight effect. If you create a curve adjustment layer in Photoshop... it will automatically create a white mask on that same layer. This is the opposite kind of mask that you need! So, do a Control or Command I to invert the white mask to become a black mask...then... paint with a soft, low opacity, white brush on that mask to place those new blown out highlights where ever you need them. Paint in these exaggerated highlights where ever you see natural highlights in your new image. You can selectively control the position... and the intensity... of the Blown Out or the Crushed Look until you are artistically happy with it. If you make a mistake...change the brush to black... and paint the mistake away. Do the same kind of thing to create the the "Crushed Blacks Look"...they can be created with another adjustment curve layer... but this time... pull the lower left part of the curve...the blacks will now get overly black. Invert the mask. Paint on the darker than darker parts in your image... till it looks dark and moody enough for you. Its an artistic judgement you can control. If you dont feel comfortable with using curves and layers... there is another user interface to curves...its called "Highlights and Shadows" under the image > Adjustments > menu. You can use this to create the blown out highlights and the crushed blacks look... with some less control. #2: To reduce some of the tonality range in the mid grays you might go to the gradient map function. It can help reduce the number of gray tones in your image with some visual experimentation. Again you can use the mask to paint in this effect on just the parts of the image where you need it. The look you see in the original image was probably created by using the old "Tri-x Film" in those days...and over pushing the development time created images that had blown out highlights, crushed blacks, high contrast in the mid-tones, and it also added a lot of extra film grain noise to the negative. #4: Getting the blurryness to look good in your image is NOT from using gaussian blur... which everyone quickly recognizes...but use the Lens Blur/Camera Blur Filter in the Filters Menu for a more real believable look. You can even tell the Lens Blur Filter "where" to blur your image... and by "how much"... in the areas that you want to be selectively soft or in-focus. This feature is enhanced in CS6. #5: The film grain noise can be added to the image from several places in Photoshop. Youre looking for the Grain Filter... or the Conte Crayon filter...or the Noise/ Add Noise filter. If you use a mask on these layers...then you can paint the noise selectively in the image. You can also Google some texture grain sheets or external plugins called "tri-x filter" or "Tri-x Plugin" or "Tri-x Film Look". This could help you get your LOOK and it might be somewhat easier. You can also try to add some film grain noise in your camera body... by running high ISO settings... but that look will be permanently imbedded in your image. Digital film grain looks slightly different than film emulsion grain does...but its somewhat close. These are just some pieces and parts of the things you could do and use to match up your image to the old style images. Sorry for the long post! Some people like posts that are quick and short...other people want "all the steps" so they can get a handle on how to do it... step by step. There are many other ways to attack these visual characteristics in Photoshop, Lightroom and several third party image control programs. Getting the look just right is going to be an artistic judgement call on your part...so experimenting and using the opacity slider on each layer can allow you to vary the intensity of each look further. Best of Luck... Ray Oct 10 12 11:50 am Link you put your camera on a tripod and use a slow shutter speed. I would show an example photo from my port, the last bw in the chocolate album but I can't access my port due to bad gateway errors as to the highlights et all, it is pretty easy to manipulate that in lightroom  to make it clear, this photo is showing ONLY the way you can manipulate an image in lightroom to have the burned out high lights et all. Oct 10 12 11:55 am Link Michael Pandolfo wrote: Thanks. I really like that shot too. Just wish it was bigger than 1080x1920 so I could print it at a decent size. Jon Tiffin wrote: I actually use COP as well. Never really messed with the clarity slider, but I'll have to give it a shot and see what I can get with it. paragonfl wrote: Studio. I'm not trying to mimic this shot exactly or anything. Just want to get the feel of it. My only question in regards to lighting is if I should use hot lights which it's looking like I'm going to have to so the flash doesn't freeze everything really sharply. Oct 10 12 12:02 pm Link Paramour Productions wrote: Good Egg Productions wrote: Maybe my eyes are getting tired, they don't look "razor" sharp to me. In focus, for sure; sharp enough, certainly, but still a hair (hahaha) soft. Kind of like some of Roversi's work. Then again, that could be the scan or the print. Without being able to look at the negative on a lightbox it's hard to judge. Oct 10 12 12:06 pm Link Brian Schmittgens wrote: good thing it is referencing the highlights only. If you had read my post you would know that. The shot that references the feel I CAN NOT access due to MM having a bad gateway on my portfolio of images. Oh well, people ask why I never post in the retouching forum, and this would be it. Oct 10 12 12:08 pm Link Paramour Productions wrote: Paramour Productions wrote: Maybe my eyes are getting tired, they don't look "razor" sharp to me. In focus, for sure; sharp enough, certainly, but still a hair (hahaha) soft. Kind of like some of Roversi's work. Then again, that could be the scan or the print. Without being able to look at the negative on a lightbox it's hard to judge. Maybe "razor" was a little ambitious. However, hair is very very thin. And it's really light and tends to move a lot, and quickly. If there was ANY movement; wind, breathing, head movement, whatever, that hair would be moving quite a bit and anything longer than 1/60 would seem to me to introduce a lot of motion blur in something that bright and thin. Oct 10 12 12:17 pm Link Try using a wide open F-stop (smaller number) while shooting the picture. Oct 10 12 12:32 pm Link Good Egg Productions wrote: OH, I AGREE! But 1/60, hell even 1/125 depending on the focal length of the lens could impart a bit of softness. Fact is, we don't really know enough. I'm assuming (and you know what that means) that a LONG lens was used here. Might not be true... Oct 10 12 12:33 pm Link and this is the last i'm going to post but I have to post this because it freakin annoys me when people don't even try and do their own research first. Here is how I would do the research First thing first, where was this photo taken? This photo is of David is from a concert (I think after examining it that is the best guess), the reason why the arms are blown out it most likely the lights had a hard bright gel on them, I would say yellow is my guess from the softness around the edges and the way they were blown. It was shot with film, obviously, in the 1970's. So I can then figure out what film (look into concert photographers at the time and see what films they used) and research how that film interacted with different colors to figure out how to do an HSL in lightroom to mimic as best you can the original effect. Now as i mentioned i am assuming it is from a concert, now i have to find a way to prove it. I do this by simply googling the subjects name. by doing that i find this, a different photo from the concert that shows a bit more where the lighting is coming from also I see a mike stand in on the edge of the photo, in just the right place to bisect when you change your direction to photograph the original image shown 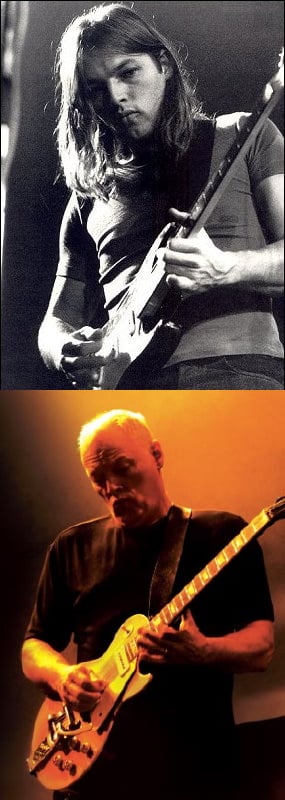 from the fit of the t-shirt i know this is likely to be from the same set of images, (it is possible it is a different shirt/concert, but everything else is so similar I would think close enough.) This new image shows me enough of the lighting to give me an idea of what is going on. Then I could look through youtube (not from live at pompeii but lots of images in there to look through), http://www.youtube.com/watch?v=n1yxNjU7 … re=related and find videos that have pink floyd concerts in them and see if I can find something that matches the photograph. I see that the majority of their concerts were at outdoor venues, so I know that there is wind and other atmospherics in the works. Then i could see the entire set and know what i am working with to a t. That is how i would research recreating an image,  Oct 10 12 12:40 pm Link High iso.. Shot in jpeg / B&W @ iso 6400 http://www.flickr.com/photos/11374619@N … 296321833/ http://www.flickr.com/photos/11374619@N … 296321833/ http://www.flickr.com/photos/11374619@N … 870009802/ Oct 10 12 12:50 pm Link Also try using a low powered light source, push up your ISO, turn off any High ISO processing you may have in your camera to generate noise, and increase contrast in post production. Sort of like pushing Tri-X in the days of digital. Oct 10 12 01:04 pm Link Star wrote: Then don't post. If you're gonna act like some high and mighty martyr, then I really don't want your help. Oct 10 12 03:24 pm Link Looking like I'll just use a few 1K Arris with dimmers on them to dial it in just right, wide aperture, and slightly slower shutter speed than usual. Thanks, everyone, for the help! Oct 10 12 03:35 pm Link Star wrote: But if you look closely at the image you posted you can tell from the musculature of the arm that, clearly, he had worked out for 2 hrs, compared to the OP's image. Oct 10 12 03:43 pm Link Michael Pandolfo wrote: hahahah bravo Oct 10 12 03:49 pm Link ChiMo wrote: This, or add film grain in post processing Oct 10 12 04:15 pm Link mmcreative wrote: yesss...thats what I've been missing all the time..thank you! Oct 10 12 07:58 pm Link Live concert photography is a big piece of my bread and butter. I shoot fast prime lenses CZ 85mm 1.4 and CZ 24mm 2.0. I usually shoot them wide open or very close to it, no flash. Green gel or parkans lights are the best. Reds are the worst. White is good but it happens much less than other colors. Iso depends on venue but never over 1000. Here are some examples https://www.facebook.com/media/set/?set … 668&type=3 Oct 10 12 08:13 pm Link Brian Schmittgens wrote: if you weren't being a jerk to me first maybe I wouldn't have jumped on your case. I'm sorry that you are being lazy and want someone to hold your hand, which I did above letting you know about the gels, linking to a video concert that they did near the same time period but hey you want to be a martyr go ahead. But if you find yourself later thinking, hey that information I read from that girl on MM was helpful then maybe you could come in and give an apology. Oct 11 12 12:17 am Link 1/20th - 1/30th of a second and a wide open aperture usually works for me. Or rather those are similar results when I am set there anyway. I prefer sharper images but I know when I am at those settings I am usually going to be less sharp.  I did a shoot this weekend with some hot lights and a speedlight with a gary fong for fill and shot some at those very settings and my results were similar although the lighting was brighter. On purpose of course. I was creating something (my current avi) and needed the slow speed while the model moved for me. But even the still shots had that approximate "blur" to them. I hope that helps. Test it out and let us know how it all worked out for you. Oct 11 12 01:01 am Link Star wrote: Didn't really stick to that, did you? Brian Schmittgens wrote: See how I said I use it as a base? That means it's a starting point for me. I start with it and then make adjustments as I see fit. Try reading before jumping on me again. Star wrote: How was I being a jerk? I simply said that photo you posted was really sharp and I was simply researching the soft look of the original. It wasn't a personal attack, so I'm not really sure why you took it that way. Seems you're really blowing this out of proportion. Star wrote: You seem to be the only one who thinks I'm being lazy and has a problem with me asking a simple question. Star wrote: Personal attacks? Real mature. Oct 11 12 05:46 am Link And again, thanks to everyone who's actually being helpful for your input! I'll probably do some test shots some time in the next couple days. Oct 11 12 05:51 am Link New Century Studio wrote:
Oct 11 12 05:58 am Link Take ANY Tameron short zoom lens + 800 ISO and you'll have it. Oct 11 12 06:06 am Link Paramour Productions wrote: That was my sense of it.. I'd say Tri-X.. pushed so you can hand hold.. shoot a bunch.. scan for prints... Oct 11 12 06:31 am Link That's David Gilmour in the early days of Pink Floyd so it is film and has the grainy look of high ISO film. Think Pink!!:-) Oct 11 12 06:48 am Link You can still get Tri-X 400... Oct 11 12 06:58 am Link |