|
Forums >
Photography Talk >
MojoKiss Color Secrets
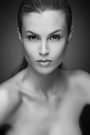
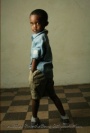
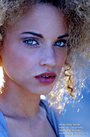
(added later - when doing the blur/add noise, you gotta mask/reveal that layer once effected) INTRO: Finally im going to sit here and try to make a tutorial on my methods - - - well it looks like NOTHING is working now - PS wont open, my mic wont work, etc. - - - so ill just make this an informative introduction - and informal informative intro and take it from there - - - people wanna know a few things about my techniques in my post production. MY WORK FLOW: 1. from camera to my computer - some folder on my new hard drive - takes a few minutes 2. drag and drop into lightroom, name it, tag it 3. color correct best i can in light room 4. from lightroom, open an image in photoshop in 16bit adobe rgb mode 5. the real craziness starts - duplicate all or part of the image into a new layer 6. fix this new layer using patch tool, spot healing, clone, as needed 7. duplicate and edit further using paint brush set around 30 percent, sampling nearby colors usually lighter than the area being corrected for shadow or contour problems 8. duplicate and apply smooting and add noise (see post below) to make it all fit into the rest of the untouched image 9. merge newest layers to a completed image, duplicating as needed to preserve edit points/save points 10. use liquify 11. gradient map layer effect (see post below) with hue value of 30 added in middle of greyscale gradient and opacity 30% 12. color ballance - as needed 13. channell mixer if needed - various techniques 14. save, crop and resize to print or web size 15. unsharp mask set to 50% and 0.8 to 1 pixel 16. shadow highlight for extreme dark areas (can be used sooner) 17. use smooth/add noize technique to obscure noise or low quality areas of shadows if desired 18. flatten and save as .png 19. convert to 8bit and save as .png and jpg for web I'll try and make a video of all this with narration and before and after examples. you might be amazed. any questions? lets get started! theres a lot to cover - dont be shy at least say hey - - - update - here is a link - http://tutorials.foxblood.com please don't be offended that i've posted a link here. I'll take it down if its a problem. See end of this thread for my updated replies Sep 22 08 06:38 am Link Thanks for sharing. Sep 22 08 09:48 am Link This is going to be another one of those threads that I'll have bookmarked. Sep 22 08 09:57 am Link WOOO! Secrets of how I can have Mojo too! hehe. Sep 22 08 10:21 am Link bump Sep 22 08 12:38 pm Link Great info. Looking forward to the video if you get a chance to make it. Thanks for sharing your process. Sep 22 08 01:16 pm Link can you explain a little about what you do with the gradient map and channel mixer, I tought myself photoshop and have'nt been able to find a solid use for these 2 tools in my editing Sep 22 08 03:26 pm Link Blackula Photography wrote: GRADIENT MAP: Sep 22 08 07:09 pm Link How did I do? Original (out of Lightroom) on the left, Post "Mojonation" on the right...  Sep 23 08 07:03 pm Link I'm not posting in this thread because I don't want anybody to know how all over it I am.  Sep 23 08 07:41 pm Link sombitch that's a grip of commands. cries, I is doomed Thank you to another person I respect. Sep 23 08 08:05 pm Link Mike in Maryland wrote: wow great image - location, model, pose, to name a few. - thanks for sharing a before and after! i love what you did. Sep 23 08 08:37 pm Link Mojokiss wrote: Thanks!! Sep 23 08 08:38 pm Link SURFACE BLUR / ADD NOISE: to elaborate on one element of skin editing, the blur i use is surface blur. a friend of mine showed me this trick - and i tweaked it to suit me - but basically once you have your skin corrected with patching, spot tools, etc and some light correction using paint brush set at 30 percent with a lighter adjacent color (ask me about this and i'll elaborate) then you can use the surface blur, and then add noise on top of that same layer. you duplicate the basic image, or cut and paste any part of it that you want to use the effect on, into a new layer. you apply surface blue (settings are like 4 to 10 pixels and thresh of about 30) and then you apply it and then go to add noise and play with it - add some subtle noise, and then go to that same layer, mask the entire thing so it doesnt show up, and then paint in the areas you want to REVEAL!!! Sep 23 08 08:44 pm Link Mojokiss wrote: asking about the adjacent color thingie .... Sep 23 08 08:49 pm Link normad wrote: sure - Sep 23 08 08:52 pm Link thank you very much for sharing (*cookies!) Sep 23 08 09:26 pm Link now to find the perfect image to try this on. thanks mojo, gotta love this community, i will pay it forward some day i promise. Sep 23 08 11:31 pm Link Hey mojo do you have any tutorials you've done previously, that I can check out Sep 24 08 10:23 pm Link Mojokiss wrote: thats a lot of work, thank you for sharing Sep 24 08 10:25 pm Link Very cool!!! Sep 24 08 10:26 pm Link Reading all that it seems that I'm going to have to sit down one day and give it a good try. Thanks for sharing as always Mojo. Sep 25 08 02:12 am Link Rock out, Mojo. Well done. (again) Sep 25 08 03:16 am Link i love when you do these post insider thingers Sep 25 08 03:19 am Link I know you still have more secrets .....*sends more cookies* Sep 25 08 11:19 am Link stay tuned. heading to fix brothers computer now... on 3 hrs sleep! feeling good tho i'll come up with something to talk about when i get back if im still alive Sep 25 08 11:27 am Link You rock Mojo! Sep 25 08 11:30 am Link mojo is a rare individual. Sep 25 08 02:20 pm Link ??? mojo you left us. tell us the rest of the story. did you fix your brothers computer and what happened to that random pic out of lightroom? did it ever get photoshopped? Sep 26 08 12:46 pm Link nope nothing yet - just been busy and crashed tonight in my bed out of exhastion. i just got up around 2:30am and ima stay up. i need to get a more comfortable place to sit. been moving furniture around and im on the floor right now, i cant edit like this! be back in a jiffy im sure. i have to submit some stuff to a publication so more editing to come Sep 27 08 03:19 am Link It's always nice to see what others do. Not to copy them, but to see how their editing style varies from what I do. Sometimes I learn a better way to do things and incorporate that into what I do. Thanks very much for sharing. You have beautiful work. Greetings from Minnesota! Sep 27 08 03:25 am Link Seeing posts like this really enforce my good feelings about this place. People are so helpful around here, in particular photographers. I've gotten some amazing critiques from them, as well as valuable advice. That had such an adverse effect on me, just imagine the feeling when a talented photographer shares some of his hard work with us, and tells US how we can do it it. Thanks. We all appreciate it.  ~CH Sep 27 08 06:36 am Link bringing this post back to life - stay tuned. links to some small teaser video tutorials on my post edits, maybe more. Oct 08 08 03:27 am Link I so can't wait to try this tutorial/style thank you for being willing to share it! Oct 08 08 06:30 am Link little pic i shot tonight  stay tuned for my beta test teaser tutorial videos actually, email me for the link Oct 08 08 06:40 am Link Mojokiss wrote: This pic is awesome!!! How do I get the tutorial? Oct 08 08 04:06 pm Link obsolete info Oct 09 08 07:47 pm Link Mojo, I've said it before and I'll say it again- you're a cool potato! Oct 09 08 08:48 pm Link Mojokiss wrote: I would love to see the lighting stuffs... Oct 09 08 09:17 pm Link obsolete info Oct 10 08 02:58 am Link |