Retouching with LUTs
Before saying anything I would like to point out that this is not a tutorial, not a universal recipe or a quick and easy solution for post-processing work. One who is serious should always explore and learn new things. Certain tool names will inevitably be mentioned but that is for the sake of sharing useful information, not for the purpose of recommendation of a best way or for the promotion of a particular product or brand. Tools change all the time but the principles remain. There is also no claim that you will find here something sensational or never seen before. I am not your teacher and you are not my students. We are just people who all learn and share together and this short article is simply an answer to some of the questions I received from many photographers and retouchers about working with LUTs.
What is a LUT
The term LUT used here is an abbreviation of look-up table, more specifically a color look-up table. In short it is a way to instruct the computer how to change certain colors of the input image (source) to other colors (target). If you are interested in more detailed technical explanation here is a link: Color look-up table
Why LUTs?
We have been struggling with Photoshop’s tools for color correction for many years. We have been offered all kinds of clever solutions such as luminosity and other masks, curves presets, action presets, plugins by various vendors. Today we have the ability to use LUTs as adjustment layers and this has been around for a while. However it seems few people use this ability for various reasons: either because of the safety of sticking to old traditional workflows or because they were told “LUTs are for video”, or because they don’t have any usable LUT files to work with, or because someone they admire recommends something else. But if you spend the time to see and understand the efficiency which LUTs offer you will know how to replace the 20 layers you add for achieving a particular look with just one layer. And this means smaller working files, less memory required and hence faster and easier work.
Examples:
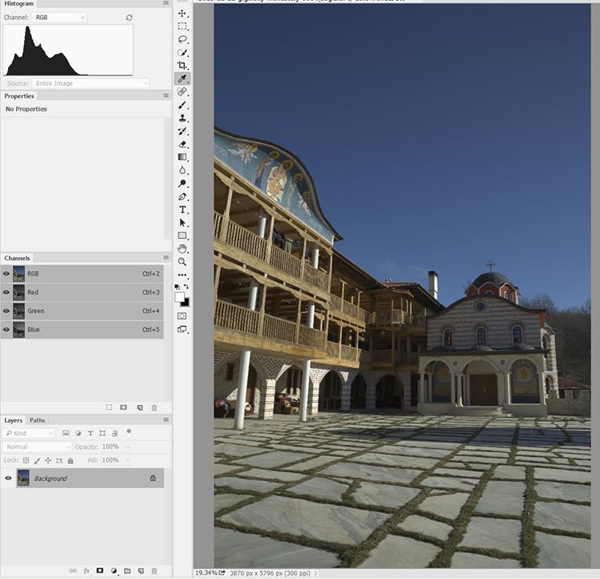
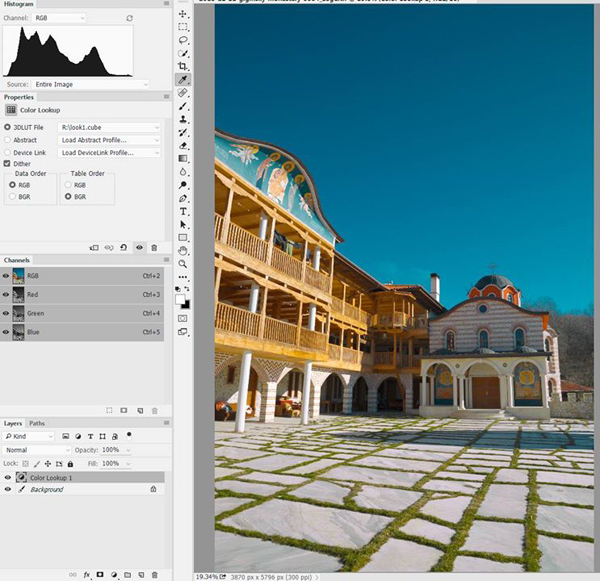
Here are examples of what a single Color lookup layer (LUT) can do. The same thing would need multiple other adjustment layers which are not as powerful and maybe even masks which introduce their own problems.

Before applying the LUT layer (raw look)

With a single LUT layer

Left: before, Right: after applying a LUT
Download the LUT file (ProPhoto RGB color space)
Download the LUT file (sRGB)
Apart from the obvious benefit of easy creation of different look presets a LUT can be very helpful in the raster level retouching as well. Here is an example of how using a LUT can visualize better the areas which need work:

Unretouched image (cropped)

Same image with a helper LUT showing areas which need chromatic correction.
Note that this would not be possible to do in RGB if you are simply adding a desaturation layer and a curve on top of it, which is the traditional way of doing D&B. I won’t go into all this because it is a subject on its own and won’t fit in here.
An important note
Input Matters
A LUT translates one set of RGB values to another. It is very important to note that although LUTs are an easy way to create presets for different looks, one LUT cannot fit every image because RGB values are not enough on their own to define color. Every image needs a color profile which defines the meanings of RGB values. In other words RGB values are just an instruction for the device/software which in combination with the color profile define the actual color which will be displayed or printed. In that sense a LUT which is made for sRGB obviously won’t reproduce the same look if applied on an image with Adobe RGB profile.
Creating LUTs
There are different ways and tools to create LUTs. A LUT file being basically a text file is obviously not something you would want to type by hand – you need a visual instrument for that. Most of the software tools which are able to generate LUTs are indeed focused on video/cinema and it makes sense – for motion picture you cannot create mask for the sky for each and every frame, you need to define a procedure for it and LUT is a convenient way to do that.
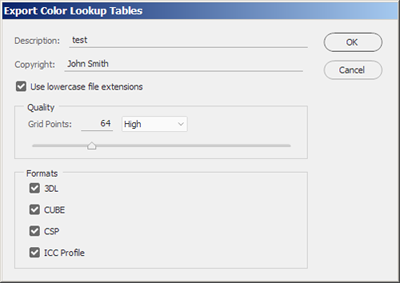
You can export LUT files using Photoshop too. Try to add a few adjustment layers (do not add layer masks, they cannot be stored in LUT) then use File->Export->Color Lookup Tables:

Usually what you want is 3DL or CUBE
This will give you a single .3dl or .cube file which you can load in a Color lookup layer. However the adjustment layers in Photoshop are quite limited and you still won’t be able to get the full power of LUTs. The “flattening” of multiple adjustment layers to one single LUT layer can help you work more efficiently but in Photoshop there is no tool which can help you shift for example: dark reds to bright greens and at the same time preserve bright neutrals while also moving light blues to yellow. For anything like that you would have to construct your own layer rig, maybe even use masks or different color models (like CMYK or LAB). Why is it limiting? – Because every time you retouch the image underneath the adjustment layers on top have to be re-applied and if they contain masks you would have to regenerate the masks. Or if you decide to retouch after applying color correction, that means you are stuck with that color look and should not change it any more (or you have to add more layers and masks after retouching and all the rest of it – huge files, slow work).
There is a tool which has been around for a few years, called 3D Lut Creator (3DLC). When I found for the first time it wasn’t as powerful but today it is very good and constantly improving. It has the simplicity of being fairly intuitive to work with if you understand how color works. I have asked my friend Oleg Sharonov (the creator of 3DLC) to expand more on the technical side of working with LUTs in photo retouching. We often have lengthy discussions about that and improvements in the program so I am sure the short additional notes by him will be helpful:
“I agree with everything you said so far. The main idea is that masked corrections produce discontinuity of L, A, or B components. So having the whole correction in form of a 3D mesh gives you control of the shaping of these components instead of cutting the color space. Photoshop doesn’t give you much of analysis tools too. I made vector-scope for Photoshop far before making 3DLC. I took a screenshot and analyzed it. So now we’ve got much more analysis tools than any video editing software, not talking about Photoshop. Another thing which is specific about 3DLC is that no other application can edit editing existing LUTs (AFAIK).” – Oleg Sharonov
What LUTs cannot do
An important thing I would like to add as a final note is that LUTs don’t completely eradicate the need for masks. You still need to use masks for isolating local corrections. Another limitation of LUTs is that they work only in RGB color model and in maximum 16 bits per channel. For other color models we need to use different approach.


May 30, 2017 at 2:04 pm, Jahid said:
there is amazing work of photo editing work.