Photographer
Kelvin Hammond
Posts: 17397
Billings, Montana, US
Koray wrote:
- Now instead of gaussian, I apply a surface blur. watch the edges and adjust the threshold accordingly and set your radius higher than the threshold. Since I dont know what I'm doing I dont have any numbers or fancy ratios for you  I'm goofing around with your surface blur idea right now, but as far as I can tell, surface blur is really really slow?

Photographer
Viewu
Posts: 820
Bradenton, Florida, US
Photons 2 Pixels Images wrote:
I'm sorry, I wasn't paying attention. My bad. 
You are trying to load an action, not a script. To load an action, go to your actions palette and in the upper right corner, there is a drop-down menu. Click that, then click Load Actions...
Navigate to where the action is and load it. You may want to place it in the Actions folder first and load it from there.
To be on the safe side, once you do this restart Photoshop and make sure your action is still there. No you were right about loading a script and thanks. I did know how to load an action...I just don't know how to weed down all the actions I have because I have one for almost everything if it will make my workflow even a split second faster...haha.
Thanks again.
Photographer
Viewu
Posts: 820
Bradenton, Florida, US
Smedley Whiplash wrote:
I'm goofing around with your surface blur idea right now, but as far as I can tell, surface blur is really really slow? For me surface blur is really really slow in 16BIT, working with 7GB of RAM. Like go to the gym, eat a sandwich and come back later slow...

Photographer
Photons 2 Pixels Images
Posts: 17011
Berwick, Pennsylvania, US
Viewu wrote:
No you were right about loading a script and thanks. I did know how to load an action...I just don't know how to weed down all the actions I have because I have one for almost everything if it will make my workflow even a split second faster...haha.
Thanks again. No problem. I started a thread HERE if you ever need help with scripts and/or actions. 

Digital Artist
Koray
Posts: 6720
Ankara, Ankara, Turkey
Smedley Whiplash wrote:
I'm goofing around with your surface blur idea right now, but as far as I can tell, surface blur is really really slow? it is slow but not over 30 sec or a minute for a RAW with 9 gigs ram.
Photographer
Photons 2 Pixels Images
Posts: 17011
Berwick, Pennsylvania, US
Updated action set. I've been playing around with the action set a bit and made some revisions. Thanks go to Lumigraphics for pointing me in the right direction for something I have been trying to do. Revisions: There is now no need for a script. I included both RGB/8 and RGB/16 versions of the actions. Both are identical except for the Apply Image. Also included is a version that works for Photoshop 7+. While working on that one, I realized that the action ran quicker without using a smart object for the GB/LF layer and changing the level of blur for each separation, but instead using new layers copied from the original and applying GB to them. So that's how it works now. It doesn't include everything that everyone has asked for. What it does include now, though, is a curves adjustment layer linked to the High Frequency layer. Play with the curves. You might like it. Also, you may notice a little warning dialog when you first start the action that says "The command Select All Layers is not currently available." This is because the action wants to make a copy of all your current layers, merge them, then perform the separation on the copied/merged layer in order to preserve your current work/layers up to that point. This was a request by someone earlier in the thread. If you don't need this and want to just merge all layers to flatten them before proceeding, just delete the first and second actions in the set. Or, just click Continue whenever you're presented with the dialog. Located at: http://www.nunuvyer.biz/Photoshop/Frequency-A.zip
Photographer
Photons 2 Pixels Images
Posts: 17011
Berwick, Pennsylvania, US
S T U D I O S I X wrote:
Sorry but what's a selective band stop? It's like filtering out a range of frequencies. For imaging, it would be filtering out a specific range of details based on their size. He separated out at 5px for the second image then applied a 15px blur to the low freq layer. The 15px blur by itself would blur out anything up to a 15px radius and by keeping the 5 px separated HF layer, he's keeping in any detail 5px or less. So, he's filtering out anything between 5 and 15 px. For this specific image, that worked to help filter out a lot of the "skin imperfections" though I shouldn't call them imperfections. It would necessarily be different for each image.
I hope I explained that right.

Digital Artist
Michael C Pearson
Posts: 1349
Agoura Hills, California, US
Wow, I just started to appreciate how heavily this enhances sharpening. When I began working on this image, I looked sharp to me! After I applied sharp sharped and curves to the high-frequency layer, the original looks out-of-focus! O.O ![https://a2.vox.com/6a0110184cd071860f011016436eaa860b-pi]() Oh, and the sharpening brought out my poor isolation. That's the white halo you can see along parts of her body and especially her hair (how embarrassing!).
Digital Artist
Michael C Pearson
Posts: 1349
Agoura Hills, California, US
On second look, I think I may have over-sharpened this one a bit...
Photographer
Photons 2 Pixels Images
Posts: 17011
Berwick, Pennsylvania, US
S T U D I O S I X wrote:
Sorry but what's a selective band stop? Before I forget, I worked out a way to incorporate grahamsz's (sp?) idea presented here of a bandstop filter in with the actions if anyone is interested.
It goes through the actions in the above linked set and sets up for the masked sharpening group. Then does a separation linking a curves layer to the high frequency layer so the curves adjustments only affect the HF. Handy. Then it copies the low frequency layer, sets it as a smart object, and runs a GB on it. I doubt it needs to be a smart object since I've not yet readjusted it once I set it up.
What I do is for the main separation, I turn the GB radius all the way down, then slowly turn it back up until the details I want to preserve just blur out (disappear) then apply image on that. Then, on the copied LF layer, I run another GB and again I start with it all the way down. Remember, this layer is already blurred from the separation. Then I slowly turn up the radius until the details I don't want blur out without going too far. Then I set an inverse mask on it and paint out with low opacity brush until it looks good.
Then I'll do some simple cloning/tone adjustments on this second LF layer if needed before merging it with the original LF layer. Then I proceed from there.
Anyone interested, let me know and I'll post up the actions for this.
Photographer
Photons 2 Pixels Images
Posts: 17011
Berwick, Pennsylvania, US
mikedimples wrote:
On second look, I think I may have over-sharpened this one a bit... I love it. But, I tend to oversharpen according to some people too.
Photographer
Photons 2 Pixels Images
Posts: 17011
Berwick, Pennsylvania, US
Photons 2 Pixels Images wrote:
Updated action set.
I've been playing around with the action set a bit and made some revisions. Thanks go to Lumigraphics for pointing me in the right direction for something I have been trying to do.
Revisions: There is now no need for a script. I included both RGB/8 and RGB/16 versions of the actions. Both are identical except for the Apply Image. Also included is a version that works for Photoshop 7+. While working on that one, I realized that the action ran quicker without using a smart object for the GB/LF layer and changing the level of blur for each separation, but instead using new layers copied from the original and applying GB to them. So that's how it works now.
It doesn't include everything that everyone has asked for. What it does include now, though, is a curves adjustment layer linked to the High Frequency layer. Play with the curves. You might like it.
Also, you may notice a little warning dialog when you first start the action that says "The command Select All Layers is not currently available." This is because the action wants to make a copy of all your current layers, merge them, then perform the separation on the copied/merged layer in order to preserve your current work/layers up to that point. This was a request by someone earlier in the thread. If you don't need this and want to just merge all layers to flatten them before proceeding, just delete the first and second actions in the set. Or, just click Continue whenever you're presented with the dialog.
Located at: http://www.nunuvyer.biz/Photoshop/Frequency-A.zip OK. From another thread here there was a request to include instructions for how to use this so I'm going to go through and explain how I use this action set. I'm sure there are more uses, but I'm only a basic retoucher.
First I'll describe the layers from bottom up:
1. Frequency-this is the original base "Background" layer. If you had a bunch of layers already in your workflow, this will be a merged copy of all those layers.
2. Low Frequency-this is the original minus the details you separated out based on the level of GB you chose.
3. Touchup-this is a blank layer for you to add colors, tones, etc to fix or enhance those properties that you don't want to change on the Low Frequency layer.
4. High Frequency-this layer contains all the detail separated out based on your level of GB chosen.
5. HF Curves adj-this one is actually fun and very nice to have. It simply does a curves adjustment on only the High Frequency layer.
6. Sharpen-this is actually a group of layers that contain separated data at different GB levels and has an inversed mask.
7. Dodge/Burn-this does basically what the layer name suggests. Dodges and Burns.
How to use this. Well, first you have to run the action. When you get to the GB dialog, you want to figure out the best level based on what you need. This is all subjective to how your workflow goes. Generally, you want to set it at a level where the details are just blurred out. The next action I post will be a bit more involved at this point, but I'll discuss that when I post it.
Now that the layers are set up, I normally start with a bit of selective sharpening. For this, I grab a white brush with a very low flow (5% for me and pressure sensitive) and paint onto the Sharpen layer's mask where I want to sharpen. Usually eyes, jewelry, etc. Then I'll hide the High Frequency layer and work on the skin tones on the Low Frequency layer and Touchup layer. I just try to even things out the best I can. Once I'm happy, I'll make the High Frequency layer visible again and adjust the curve attached to it to add some contrast for a sharpened look. Then I work on cloning/healing on the High Frequency layer until the details look good to me. Keep in mind, this isn't the same as healing/cloning on a normal layer. It sometimes works differently than you would expect.
Once that is all finished, you're done. If you need to do any dodging/burning then grab your brush tool and paint on the Dodge/Burn layer white to dodge and black to burn. Sometimes you will need to dodge some spots that you sharpened by unmasking in the Sharpen mask. It tends to brighten the lighter areas and darken the darker areas a bit much sometimes.
If any more questions, please don't hesitate to ask.

Photographer
Andrew77uk
Posts: 320
Salisbury, England, United Kingdom
Whilst you can notice this on screen, most people still prefer to see in an image on paper. Question is... does this effect really make a huge difference to your final print?

Photographer
Sean Baker Photo
Posts: 8044
San Antonio, Texas, US
Andrew Chorley wrote:
Whilst you can notice this on screen, most people still prefer to see in an image on paper. The print industry would beg for that to still be true.
Andrew Chorley wrote:
Question is... does this effect really make a huge difference to your final print? That depends on what you do with it.

Photographer
Jerry Bennett
Posts: 2223
Philadelphia, Pennsylvania, US
Photons 2 Pixels Images wrote:
Updated action set.
I've been playing around with the action set a bit and made some revisions. Thanks go to Lumigraphics for pointing me in the right direction for something I have been trying to do.
Revisions: There is now no need for a script. I included both RGB/8 and RGB/16 versions of the actions. Both are identical except for the Apply Image. Also included is a version that works for Photoshop 7+. While working on that one, I realized that the action ran quicker without using a smart object for the GB/LF layer and changing the level of blur for each separation, but instead using new layers copied from the original and applying GB to them. So that's how it works now.
It doesn't include everything that everyone has asked for. What it does include now, though, is a curves adjustment layer linked to the High Frequency layer. Play with the curves. You might like it.
Also, you may notice a little warning dialog when you first start the action that says "The command Select All Layers is not currently available." This is because the action wants to make a copy of all your current layers, merge them, then perform the separation on the copied/merged layer in order to preserve your current work/layers up to that point. This was a request by someone earlier in the thread. If you don't need this and want to just merge all layers to flatten them before proceeding, just delete the first and second actions in the set. Or, just click Continue whenever you're presented with the dialog.
Located at: http://www.nunuvyer.biz/Photoshop/Frequency-A.zip Thanks! Sounds like a great update, I'll be sure to download it when I get home.
Photographer
grahamsz
Posts: 1039
Boulder, Colorado, US
Smedley Whiplash wrote:
I'm goofing around with your surface blur idea right now, but as far as I can tell, surface blur is really really slow? I've had reasonable results using it to clean up partial areas of the low frequency layer after the separation is done. In my example that was handily reposted above, try using a surface blur instead of the second gaussian blur. It creates something that doesn't look as plasticy when you zoom out
Photographer
grahamsz
Posts: 1039
Boulder, Colorado, US
Photons 2 Pixels Images wrote:
I hope I explained that right. Pretty much spot on. It's almost exactly the same principal as the auto voice removal on a kareoke machine, it just wipes out a range of frequencies and hopes that they are the right ones
Photographer
Photons 2 Pixels Images
Posts: 17011
Berwick, Pennsylvania, US
grahamsz wrote:
Pretty much spot on. It's almost exactly the same principal as the auto voice removal on a kareoke machine, it just wipes out a range of frequencies and hopes that they are the right ones I've been playing with this a bit more and it definitely cuts down on the amount of cloning/healing I have to do on the skin.
I actually just ran an image through this process and did no cloning/healing at all. Now, it isn't up to a beauty shot, but it's on par with most of my stuff.
Ran the separation. Set the GB radius to just above where the details disappear. Copied the LF layer and ran another GB on that (already blurred some) and adjusted it until the stuff I didn't want had just disappeared. Inverse mask on this and paint white over the face until I get what I want.
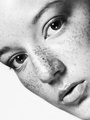
Then I tried another image that had a bit more "crap" in it. I did basically the same as above but for the second blur, I couldn't take it too high or it would take out her freckles too. So I adjusted to keep the freckles. Then after painting on the mask to get it looking like I wanted, I merged the layers and ran it through another separation. This time I blurred until the freckles just disappeared for the separation, then for the second blur I adjusted until the larger zits, etc. disappeared. Inverse mask and paint. The nice thing about this is there were still a couple zits that were about the same size as the freckles, so I just unmasked those spots to eliminate them.
This way saved me so much time it isn't even funny. Now I gotta figure out a way to automate all this and stick it into my workflow.

Photographer
Robert Randall
Posts: 13890
Chicago, Illinois, US

Photons 2 Pixels Images wrote:
Updated action set.
I've been playing around with the action set a bit and made some revisions. Thanks go to Lumigraphics for pointing me in the right direction for something I have been trying to do.
Revisions: There is now no need for a script. I included both RGB/8 and RGB/16 versions of the actions. Both are identical except for the Apply Image. Also included is a version that works for Photoshop 7+. While working on that one, I realized that the action ran quicker without using a smart object for the GB/LF layer and changing the level of blur for each separation, but instead using new layers copied from the original and applying GB to them. So that's how it works now.
It doesn't include everything that everyone has asked for. What it does include now, though, is a curves adjustment layer linked to the High Frequency layer. Play with the curves. You might like it.
Also, you may notice a little warning dialog when you first start the action that says "The command Select All Layers is not currently available." This is because the action wants to make a copy of all your current layers, merge them, then perform the separation on the copied/merged layer in order to preserve your current work/layers up to that point. This was a request by someone earlier in the thread. If you don't need this and want to just merge all layers to flatten them before proceeding, just delete the first and second actions in the set. Or, just click Continue whenever you're presented with the dialog.
Located at: http://www.nunuvyer.biz/Photoshop/Frequency-A.zip I just downloaded the action, and I'm a bit lost. I keep getting error messages about masks and layers not being available. I ran into this with the first action and ultimately I had to recreate my own version of it to avoid the error messages.
So, to help me out, LF1 and HF1... are they in luminosity mode?
Photographer
Photons 2 Pixels Images
Posts: 17011
Berwick, Pennsylvania, US
Robert Randall wrote:
I just downloaded the action, and I'm a bit lost. I keep getting error messages about masks and layers not being available. I ran into this with the first action and ultimately I had to recreate my own version of it to avoid the error messages.
So, to help me out, LF1 and HF1... are they in luminosity mode? The error could be what I mentioned in the post since the action is trying to copy and merge all your current layers. If you only have your Background layer, you will get a message saying that layers aren't available.
If this is what is happening, then just delete the first 3 steps in the action.
If not, then the only blend modes that aren't "Normal" are on the HF/High Frequency layers. They are "Linear Light" and the "Dodge/Burn" layer which is "Soft Light" and the grouped "Sharpen" layer which is "Hard Light".
Which version of Photoshop are you using? Mac or PC?
First try deleting the first 3 steps in the action and see if that fixes your problem. If not, please let me know exactly what message you're getting so I can fix it.
Photographer
Robert Randall
Posts: 13890
Chicago, Illinois, US
Photons 2 Pixels Images wrote:
The error could be what I mentioned in the post since the action is trying to copy and merge all your current layers. If you only have your Background layer, you will get a message saying that layers aren't available.
If this is what is happening, then just delete the first 3 steps in the action.
If not, then the only blend modes that aren't "Normal" are on the HF/High Frequency layers. They are "Linear Light" and the "Dodge/Burn" layer which is "Soft Light" and the grouped "Sharpen" layer which is "Hard Light".
Which version of Photoshop are you using? Mac or PC?
First try deleting the first 3 steps in the action and see if that fixes your problem. If not, please let me know exactly what message you're getting so I can fix it. CS3 on a MAC. I tried both 16 bit and 8 bit just to see if there was a difference, and the results were the same. I run the actions by hand, meaning I click on each step to activate the action one step at a time. I started at the first and then the fourth step, and I couldn't keep up with the error messages. I'll try again later today when I return from location.
Photographer
Photons 2 Pixels Images
Posts: 17011
Berwick, Pennsylvania, US
Robert Randall wrote:
CS3 on a MAC. I tried both 16 bit and 8 bit just to see if there was a difference, and the results were the same. I run the actions by hand, meaning I click on each step to activate the action one step at a time. I started at the first and then the fourth step, and I couldn't keep up with the error messages. I'll try again later today when I return from location. OK. Let me load up my version of CS3 and see if I can get it to work.
Have you tried the PS7 version?
I honestly have no idea what it could be. But I'll check some stuff out and see if I can find an answer for you.
Photographer
Photons 2 Pixels Images
Posts: 17011
Berwick, Pennsylvania, US
Robert Randall wrote:
CS3 on a MAC. I tried both 16 bit and 8 bit just to see if there was a difference, and the results were the same. I run the actions by hand, meaning I click on each step to activate the action one step at a time. I started at the first and then the fourth step, and I couldn't keep up with the error messages. I'll try again later today when I return from location. OK. I see where the problem is now. During the steps in the action, the action names some of the layers then later goes back to those layers based on their names. When I click through a step at a time like you are doing, it doesn't set those layer names for me. I get "Background copy" instead of "LF1 mask" and "Background copy 2" instead of "HF1 mask". Even though the names appear in the dialog that comes up when that step is run, it doesn't actually name the layer. Also, when I did that for some reason Photoshop edited my actions.
I'm going to mess with this some more and see why it's doing this.
Photographer
Robert Randall
Posts: 13890
Chicago, Illinois, US
Photons 2 Pixels Images wrote:
OK. I see where the problem is now. During the steps in the action, the action names some of the layers then later goes back to those layers based on their names. When I click through a step at a time like you are doing, it doesn't set those layer names for me. I get "Background copy" instead of "LF1 mask" and "Background copy 2" instead of "HF1 mask". Even though the names appear in the dialog that comes up when that step is run, it doesn't actually name the layer. Also, when I did that for some reason Photoshop edited my actions.
I'm going to mess with this some more and see why it's doing this. The work around for the older version was to manually create the Sharpened and Detail layers and then switch mode to luminosity before I started clicking through the action steps. My reason for the manual clicking is the need to adjust the level of blur and sharpen for the different file sizes I use all day.
I tried to rename the layers for this new action, but I didn't quite understand the naming conventions until this most recent post.
Photographer
Photons 2 Pixels Images
Posts: 17011
Berwick, Pennsylvania, US
Photons 2 Pixels Images wrote:
Robert Randall wrote:
CS3 on a MAC. I tried both 16 bit and 8 bit just to see if there was a difference, and the results were the same. I run the actions by hand, meaning I click on each step to activate the action one step at a time. I started at the first and then the fourth step, and I couldn't keep up with the error messages. I'll try again later today when I return from location. Photons 2 Pixels Images wrote:
OK. I see where the problem is now. During the steps in the action, the action names some of the layers then later goes back to those layers based on their names. When I click through a step at a time like you are doing, it doesn't set those layer names for me. I get "Background copy" instead of "LF1 mask" and "Background copy 2" instead of "HF1 mask". Even though the names appear in the dialog that comes up when that step is run, it doesn't actually name the layer. Also, when I did that for some reason Photoshop edited my actions.
I'm going to mess with this some more and see why it's doing this. This is unnerving to say the least. My recommendation is to unload that action set, re-download the actions and load them, then run them as a full action set instead of individual steps. I'm guessing you have a reason for running them individually, though. It all works as advertised when I run the whole set straight through, but individually it gets messed up. I even went back and re-created the action set using CS3 and it did the same thing. It could be a bug in CS3?
I could make a work-around for this if you really need to run them a step at a time by just adding an extra step in for each layer created to rename the layer.
Photographer
Photons 2 Pixels Images
Posts: 17011
Berwick, Pennsylvania, US
Robert Randall wrote:
The work around for the older version was to manually create the Sharpened and Detail layers and then switch mode to luminosity before I started clicking through the action steps. My reason for the manual clicking is the need to adjust the level of blur and sharpen for the different file sizes I use all day.
I tried to rename the layers for this new action, but I didn't quite understand the naming conventions until this most recent post. OK. This makes sense. If you want, I can add all that into the actions with popup dialogs to allow you to make the adjustments you need. I would just need to have a breakdown of how you set it up.
Photographer
Robert Randall
Posts: 13890
Chicago, Illinois, US
Photons 2 Pixels Images wrote:
OK. This makes sense. If you want, I can add all that into the actions with popup dialogs to allow you to make the adjustments you need. I would just need to have a breakdown of how you set it up. I just ran the whole action on automatic, and there were about 8 or 9 steps that alerted error messages. I can't be sure the final result is anywhere close to what you had in mind. Sorry to be a problem for you.
Photographer
Photons 2 Pixels Images
Posts: 17011
Berwick, Pennsylvania, US
Robert Randall wrote:
I just ran the whole action on automatic, and there were about 8 or 9 steps that alerted error messages. I can't be sure the final result is anywhere close to what you had in mind. Sorry to be a problem for you. You aren't being a problem. I want to make sure this works for everyone the way they want it to work. It's kinda my anal Achilles's Heal. Like you and Sean staying up all night to figure out a new process or technique, I'll stay up all night trying to figure out how to work around this.
Did you re-download the actions before trying to run them? I noticed that when clicking a step at a time, Photoshop would change the actions on me and then it wouldn't work when I tried running through the whole thing. But reloading a fresh copy of it worked.
I'm going to redo the actions and I'll let you know when I'm done anyway. I never checked a step at a time.
One last question: Do you start this on a Background layer or do you work from multiple layers or is it mixed?

Photographer
Supermodel Photographer
Posts: 3309
Oyster Bay, New York, US
Wananga wrote:
Wow, I still just don't understand the people who think that to be an artist you can't understand anything technical behind what you are doing.
You have to know what you are doing to implement your vision, otherwise you're just pointing and shooting.
Thank you Sean for the information! I look forward to trying it out. Having vision without technique is analogous to having driving directions without a vehicle.
Photographer
Photons 2 Pixels Images
Posts: 17011
Berwick, Pennsylvania, US
OK. I redid the action set and re-uploaded to the same place. http://www.nunuvyer.biz/Photoshop/Frequency-A.zip It now should work even if going a step at a time. I took out the first couple steps that merge existing layers and now it just starts from a Background layer. If this isn't your workflow and you are having problems getting this to work, post here and I'll explain what you need to do. Thanks to Mr Randall for pointing out this little issue in Photoshop or I never would have known about it.
Photographer
Robert Randall
Posts: 13890
Chicago, Illinois, US
Photons 2 Pixels Images wrote:
OK. I redid the action set and re-uploaded to the same place.
http://www.nunuvyer.biz/Photoshop/Frequency-A.zip
It now should work even if going a step at a time. I took out the first couple steps that merge existing layers and now it just starts from a Background layer. If this isn't your workflow and you are having problems getting this to work, post here and I'll explain what you need to do.
Thanks to Mr Randall for pointing out this little issue in Photoshop or I never would have known about it. It works like a fine swiss watch wound to the penultimate degree by the loving hands of asexual forest elves. Now I just need about a day to digest what I'm looking at. Very cool indeed, thank you!
Photographer
Photons 2 Pixels Images
Posts: 17011
Berwick, Pennsylvania, US
Robert Randall wrote:
It works like a fine swiss watch wound to the penultimate degree by the loving hands of asexual forest elves. Now I just need about a day to digest what I'm looking at. Very cool indeed, thank you! And it'll take me about a day to figure out what exactly that part means. I'm guessing it's a good thing, though. Anything with Swiss watches and elves has to be good. It's gotta be better than sharpening with a sledgehammer, right?
Photographer
M A R T I N
Posts: 3893
Calgary, Alberta, Canada
I've been using the latest action set and it's helpful in many ways but I have an issue with cloning/healing. I'm finding that for things like hairs across the face or deep wrinkles it actually increases my workload and doesn't quite do what I want it to. I find I need to keep switching between high and low layers and reselecting the source because one layer won't do it all. I guess I'm asking if some major cloning should be done before the separation or if I'm just not doing it right and missing the point? As a smoothing technique it's great.
Photographer
grahamsz
Posts: 1039
Boulder, Colorado, US
Myshkin wrote:
I've been using the latest action set and it's helpful in many ways but I have an issue with cloning/healing. I'm finding that for things like hairs across the face or deep wrinkles it actually increases my workload and doesn't quite do what I want it to. I find I need to keep switching between high and low layers and reselecting the source because one layer won't do it all. I guess I'm asking if some major cloning should be done before the separation or if I'm just not doing it right and missing the point? As a smoothing technique it's great. Lately my workflow shapes out like
1) Apply any liquify changes
2) Retouch difficult defects using the usual tools.
3) Separate into frequency layers (usually between 3 and 7 px gb)
4) Duplicate the low frequency layer
5) Use the low frequency duplicate to apply a 15px surface blur to areas of skin that need to be smoothed. I'll typically do this to the forehead, each cheek, neck and sometimes arms and legs
6) Adjust the opacity of the low frequency duplicate to blend in some natural looking skin
7) Use an unsharp mask to sharpen the high frequency layer
8) Use the clone tool on 100% opacity and with a fairly sharp edged brush to touch up the high frequency layer
9) Dodge & Burn round the eyes
10) Create high and low curves adjustment layers, fill them with black and the dodge onto them to accentuate the image and restore any shadows that got lost in the prior process.
Photographer
M A R T I N
Posts: 3893
Calgary, Alberta, Canada
grahamsz wrote:
Lately my workflow shapes out like
1) Apply any liquify changes
2) Retouch difficult defects using the usual tools.
3) Separate into frequency layers (usually between 3 and 7 px gb)
4) Duplicate the low frequency layer
5) Use the low frequency duplicate to apply a 15px surface blur to areas of skin that need to be smoothed. I'll typically do this to the forehead, each cheek, neck and sometimes arms and legs
6) Adjust the opacity of the low frequency duplicate to blend in some natural looking skin
7) Use an unsharp mask to sharpen the high frequency layer
8) Use the clone tool on 100% opacity and with a fairly sharp edged brush to touch up the high frequency layer
9) Dodge & Burn round the eyes
10) Create high and low curves adjustment layers, fill them with black and the dodge onto them to accentuate the image and restore any shadows that got lost in the prior process. that sounds right to me, I think mine will be very similar. I was just wondering if some were able to use the separations from start to finish for all difficult defects and I just wasn't doing it right?
Photographer
Photons 2 Pixels Images
Posts: 17011
Berwick, Pennsylvania, US
Myshkin wrote:
I've been using the latest action set and it's helpful in many ways but I have an issue with cloning/healing. I'm finding that for things like hairs across the face or deep wrinkles it actually increases my workload and doesn't quite do what I want it to. I find I need to keep switching between high and low layers and reselecting the source because one layer won't do it all. I guess I'm asking if some major cloning should be done before the separation or if I'm just not doing it right and missing the point? As a smoothing technique it's great. Myshkin,
This is something that takes a bit of getting used to. grahamsz outlined a workflow that is very close to what I do when using this separation method. I'll normally do any major stuff first as he mentioned. Liquify, major cloning/healing. Any composites.
When I first started using this, I would go back and forth between High and Low layers. Now what I'll do is just turn off visibility for High Frequency until I get the tones evened out the way I want on the Low Frequency layer. Then turn HF back on and work on it from there. It will take some practice to get the GB set right during the separation process so your work on the High Frequency layer won't be so tedious. The trick is to blur until the detail juts dissolves and stop. If you go any further, you will carry some of the tones onto the HF layer that you will then have to work out after fixing the LF layer.
It really is a matter of practice and experience. I wish I could give you a set way of doing it. All I can say is just keep at it.
Photographer
Photons 2 Pixels Images
Posts: 17011
Berwick, Pennsylvania, US
grahamsz wrote:
Lately my workflow shapes out like
1) Apply any liquify changes
2) Retouch difficult defects using the usual tools.
3) Separate into frequency layers (usually between 3 and 7 px gb)
4) Duplicate the low frequency layer
5) Use the low frequency duplicate to apply a 15px surface blur to areas of skin that need to be smoothed. I'll typically do this to the forehead, each cheek, neck and sometimes arms and legs
6) Adjust the opacity of the low frequency duplicate to blend in some natural looking skin
7) Use an unsharp mask to sharpen the high frequency layer
8) Use the clone tool on 100% opacity and with a fairly sharp edged brush to touch up the high frequency layer
9) Dodge & Burn round the eyes
10) Create high and low curves adjustment layers, fill them with black and the dodge onto them to accentuate the image and restore any shadows that got lost in the prior process. Myshkin wrote:
that sounds right to me, I think mine will be very similar. I was just wondering if some were able to use the separations from start to finish for all difficult defects and I just wasn't doing it right? grahamsz, I'm not sure if you set up your own actions for doing this, but if not you will both probably enjoy the next action I'm working on now. It does a dual separation just like you are talking about, grahamsz, and inverts a mask on the Low Low Frequency layer to allow unmasking for easier touchup. I've found that for a lot of things this works better and quicker than either the healing tool or clone stamp.
My own personal action (which is what I use to test this stuff out before even considering making an action for everyone) will go through multiple separations giving me the option to stop or pass specific bands of frequencies.
Then, if I can figure out how, I'm going to try to take it to the next level and write up an interactive script that will do this. I would love to have access to a way to make a plugin for this but for now this is all I got.
Photographer
M A R T I N
Posts: 3893
Calgary, Alberta, Canada
Photons 2 Pixels Images wrote:
Myshkin,
This is something that takes a bit of getting used to. grahamsz outlined a workflow that is very close to what I do when using this separation method. I'll normally do any major stuff first as he mentioned. Liquify, major cloning/healing. Any composites.
When I first started using this, I would go back and forth between High and Low layers. Now what I'll do is just turn off visibility for High Frequency until I get the tones evened out the way I want on the Low Frequency layer. Then turn HF back on and work on it from there. It will take some practice to get the GB set right during the separation process so your work on the High Frequency layer won't be so tedious. The trick is to blur until the detail juts dissolves and stop. If you go any further, you will carry some of the tones onto the HF layer that you will then have to work out after fixing the LF layer.
It really is a matter of practice and experience. I wish I could give you a set way of doing it. All I can say is just keep at it. cool, that's what I needed. The technique works great, just too much work for the "major stuff" as you say. Thanks for the clarification
|