|
Forums >
Digital Art and Retouching >
"glazed" photo look
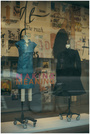
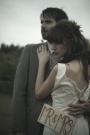
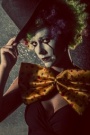
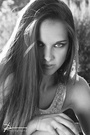
re- photography wrote: Show me. Mar 26 10 04:33 pm Link Here's my attempt at it...  Mar 26 10 06:07 pm Link Robby Miller wrote: I like it. If it were me, I would bring up the skin a bit and add in a bit of yellow Mar 26 10 06:16 pm Link shawnmakesfoto wrote: Thanks, good suggestion. Mar 26 10 06:18 pm Link Mar 27 10 09:04 am Link Here is my youngest daughter Dahlia. This was done with studio lighting...I did three different looks, red, blue and green. The first one is the original. If you like any of the three I did the screen shots of each twist made on photoshop, so just ask and I can send them to you.  Mar 27 10 09:04 am Link That's cool, Danny. I like that. Mar 27 10 12:55 pm Link Robby Miller wrote: I would love to know how you did this! Mar 28 10 08:42 pm Link Danny Rodriguez wrote: Danny, I would love to see what you did to get these images, im sure others would as well. Could you please post your screenshot for us? Mar 28 10 08:51 pm Link Tarazz wrote: can some one say what this complete picture said or re do the screen shot please? its not fully loading on my screen just up to channel Blue then the rest is grey Mar 30 10 05:14 am Link ok nvm i got it i opened it in chrome. print screen for a mac is command+shift+4 Mar 30 10 05:18 am Link Here are two of my tries:   As others said before, I basically only played with solid colors layers, blending modes and curves... Mar 30 10 01:52 pm Link i gave it a go....  Mar 31 10 07:43 pm Link My attempt!  Apr 13 10 10:26 pm Link Ryan Doco Connors wrote: I like pretty much everyone's "glazing." Apr 13 10 10:41 pm Link OK, second try:  Apr 13 10 11:12 pm Link Tarazz wrote: well thats how I do it, I guess you just have to have agood eye for tones Apr 14 10 06:00 am Link How would one go about injecting color into certain areas? For example I want to get teal into my blacks but not glaze the rest of the photo? Like what is discussed on this link, http://library.creativecow.net/articles … torial.php but in photoshop. Apr 14 10 08:46 am Link Greg Fiske wrote: 1) Apr 14 10 08:55 am Link Wow.......lots of reading, lots of amazing information. I have NEVER worked with curves and other various things mentioned in here. Thank you to everyone who has been so generous with sharing details of how they get to some of these wonderful shots. My first "attempt" at playing with some of this. Original Image:  New Image:  I kept mine a little grainier and maybe a bit dark......I liked the moodiness I thought it added to the shot.......thoughts?? ~Ben Apr 16 10 09:38 am Link SpiritSentient wrote: Great Link, i love the first one, thanks! Apr 16 10 11:02 am Link I has a couple examples in my port of what you guys are talking about I think. If you like them, leave a comment please. Apr 18 10 07:14 am Link Ryan Doco Connors wrote: I like this one a lot. Just the right amount of "glazing" and I like the lens flare. KS Art Nudes wrote: You have some really nice images. (I had already voted for your entry in the 18+ POTD contest) Apr 19 10 07:24 am Link BRC Photo Services wrote: cool. Apr 19 10 07:38 am Link BRC Photo Services wrote: Works really well, the processed version has a superb feel to it, very dark. Apr 19 10 10:37 am Link Finally have one worth posting, I think;  Not as much glaze. Prolly looks better?  Apr 19 10 06:36 pm Link MisterC wrote: Love it, I'd personally be tempted to creep in under your adjustment layers and apply a light burn to the shadows to embolden your subject a little. Apr 20 10 02:57 am Link Daniel Meadows wrote: It's a hard decision for me on many images, between a nice bold look, or more of the glaze. Apr 20 10 08:50 pm Link MisterC wrote: Care to share your secrets on these ones? May 08 10 09:39 am Link One obervation after trying this out for a few weeks... with mine, they look great on the monitor, but the resulting prints are kind of a mixed bag lacking 'pop'. (purposely, i think) I wonder if the black needs to be hyped up a little for prints? May 08 10 10:44 am Link Smedley Whiplash wrote: Another thing to consider is the paper you're printing it on... May 08 10 12:06 pm Link Tarazz wrote: The 1st thing I thought of was: May 08 10 12:15 pm Link Am I on the right track?   I applied a gradient map on luminosity, lowered fill. A selective colour layer to get the glazed look, and then tweaked it with a few curves layers, added a little more green with an exclusion layer, and tweaked a little. I added a tiny bit of contrast to the back with another gradient map set to lum. masked in, and made a sliiight change with channel mixer..i don't usually use this tool  i probably could have done it with less layers, but this took me a few minutes, and I just adjusted as I went, as opposed to getting it perfect in every layer. May 09 10 03:39 am Link Lexi Gorton wrote: No offense, but I think you could've gotten that result with a single curves layer. What exactly do you want it to look like? May 09 10 04:13 am Link Duncan Hall wrote: Oh wow, you're right. How embarrassing! May 09 10 04:28 am Link Paul Brecht wrote: Well, for starters, photo lab processing. That's probably going to be Fuji Crystal. It's very predictable stuff, but there's something strange in the prints... they look kinda blah, even though they look good on the monitor. May 09 10 08:05 am Link I follow Jamie on DeviantArt all the time so, glad to see a good thread on the technique and examples. May 09 10 10:32 am Link I think the post processing threads are by far my favorites these days.... May 09 10 11:28 am Link Like Lexi, I messed around with a bunch of layers to get a faded look and don't remember exactly what I did, but I do remember using Shadow Highlight, Photo Filter, and Difference Blending Mode..... I definitely want to take some time and learn how to do a better faded look....  May 09 10 11:41 am Link Smedley Whiplash wrote: Fuji has a new paper out that seems to be well fitted for this type effect... May 09 10 11:58 am Link |