|
Forums >
Digital Art and Retouching >
"glazed" photo look
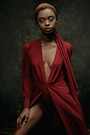
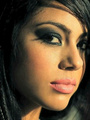
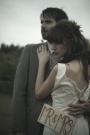
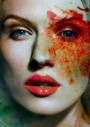
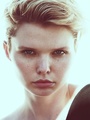
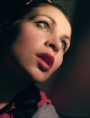
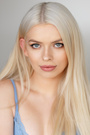
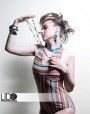
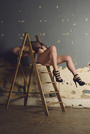
MisterC wrote: which page is the tutorial to achieve this I'm scrolling but I can't find Aug 25 10 03:06 pm Link Angela Michelle Perez wrote: You want me to scroll 9 pages for you? Aug 26 10 04:46 pm Link light room has is built in with CS5 its called dual tone  stop talking about this already Aug 26 10 05:37 pm Link nathan touchup wrote: Prove it. Many people say it's easy. So show a pic! ; ) NothingIsRealButTheGirl wrote: I maintain that it would be very unlikely for someone to make a good copy. Aug 26 10 07:28 pm Link MisterC wrote: The only way you are going to get a 'definitive answer' from someone other than Jaime is if Jaime posts a before and after and someone copies the after. Aug 26 10 08:30 pm Link Angela Michelle Perez wrote: It's already been answered, but I'll re-iterate. If you looking for an exact recipe on how to create this effect, in this thread, you won't find it. That being said, this thread is full of some really good advice, tips and tricks, and suggestions on how to get some really nice effects. Aug 27 10 11:40 am Link FSG Photography wrote: Good to see FSG representing. Almost a forum addict now! ; ) Aug 27 10 08:27 pm Link So I had the chance to shoot the Canon 5D with a nice L series lens...Of course my daughter was the model and this is the result. I tried some new little twist before the regular curves.  Oct 18 10 11:06 am Link Looks like you're getting warm, Danny. Oct 18 10 07:04 pm Link Oct 23 10 10:56 am Link You could have had a warning it was THAT song, i've been to doctors to have that removed from my head once already. Oct 23 10 11:25 am Link Oct 23 10 12:32 pm Link Am not sure if you would consider this glazed or hazed https://www.modelmayhem.com/portfolio/pic/19866415 18+ https://www.modelmayhem.com/portfolio/pic/18941785 18+ Oct 23 10 03:11 pm Link Rob Mac Studio wrote: Agreed! Oct 23 10 03:12 pm Link Rob Mac Studio wrote: Oct 23 10 04:01 pm Link Danny Rodriguez wrote: This is fairly awesome. Oct 23 10 06:05 pm Link Danny Rodriguez wrote: This is fairly awesome. Oct 23 10 06:05 pm Link New to this thread I've been wondering how do to these for family caption type portraits. I always thought this was done via lightroom or camera raw somehow. Oct 24 10 11:48 am Link The effect is simple to achieve but that is NOT the same thing as giving life to the image. Jaime Ibarra's Photography is brilliant. His usage of light and image composition and understanding the flexibility of the subject (model) is fantastic and near flawless in most cases. His post production just adds to it. It's his photography you people need to credit more than the retouch work in my opinion. His images would not be that awesome if his photography wasn't that brilliant. This is the closest THIS image can reach to this effect. Retouch by Me! Result 18+ http://img25.imageshack.us/img25/219/nyghtfalcon1.jpg Before 18+ http://img529.imageshack.us/img529/4921/nyghtfalcon.jpg Credits to NyghtFalcon for the photograph. Oct 25 10 04:02 am Link Love this thread. Have been a long time watcher. Some of you guys have really gotten very good results. I didn't actually achieve the glaze but this is probably the closest I can get.  I used an action though you don't really need one as you'll still end up tweaking it. Basically its just curves, (de)saturation on colorize mode, pink fill layer on screen mode at 8-11% opacity, light vignette, an overlay light "fill pop". Oct 25 10 12:26 pm Link Here's my first try... I'll be really glad to hear some critiques and opinions  )) ))  Jan 21 11 05:26 pm Link Phunke Pixie wrote: It's aliiiive... the thread isss aaaliiiiive... ! Jan 21 11 06:57 pm Link Heh, that's me  Thanks! Thanks! Do you think I got a similar effect to Jaime's (the posted pic here)? Jan 22 11 08:52 am Link Image shot with a Canon Xsi and the 1.8/ 50mm lens. THe girl in the image is my sister and she is no model, although on that day she became one. Haha. I give you another image with again the simple steps of curves and selective color, oh and some empty layers of different colors and blending modes of just 12 to 20% opacity. Hope you guys like it. By the way, I get lots of emails asking me for a recipe. There in no such a thing. Images are all different and require different little twitches....And when I take the time to create a little class of mine with pictures explaining the steps I'm taking, at least, be courteous enough to replay back with either a THank you email if it helped you or a FUCK YOU email if it sucks....But give me something, since I GIVE YOU my humble knowledge and precious time. Again, The reason I keep posting images is because I understand how much we like this Guy's work, oh and yeah! for bragging purposes only. haha  Feb 21 11 10:51 am Link  Click to enlarge here on MM Feb 21 11 11:30 am Link M E Y E R wrote: Love it. It's just about perfect. Feb 21 11 08:45 pm Link Hey Everybody I just completed the tutorial with Jaime.Long story short.Jaime has logged many hours into creating his signature technique.I was very impressed with his encyclopedic knowledge of photoshop and his desire to keep updating and taking his art to new levels.I give the tutorial 2 thumbs up.Can't wait to incorporate into my style. All the Best Norm Feb 22 11 10:48 pm Link TOODARKPARK PHOTOGRAPHY wrote: Post yer results! ; ) Feb 23 11 12:28 am Link TOODARKPARK PHOTOGRAPHY wrote: I did the same thing about 6, maybe 8 months ago. I cannot say enough good things about him and how he teaches. Feb 23 11 08:05 am Link I would love to have a class with Jaime just out of curiosity. I want to know the TRUTH!..haha. ANyways, until I can afford it I guess I just have to keep playing around with my toys, as Mr. C mentioned. I have this other image with Sandy.  Feb 23 11 10:08 am Link Danny Rodriguez wrote: If we're talking about awesome, that pic is it. But if we're talking about this so Hipgnosis wrote: This also just serves to prove that an interesting image to start with is most important. Feb 23 11 10:18 am Link Mister C. You are right. I picked a similar image and added the extra color as you mentioned. Also I used a different background.  Feb 28 11 02:31 pm Link I have an action for this particular look called Cross Faded. What it does is it adds some haze in the shadow and a red and blue tint in it selectively. If you are an experienced photoshop user, you can change these colors and customize their masks. A very little bit of blur in certain areas, soft vignette and a very low opacity of some grunge texture in the background and you are there. You can see the cross faded action before after on this page: http://sidvasandani.blogspot.com/2011/0 … art-1.html Feb 28 11 06:11 pm Link Sid Vasandani wrote: Cross Faded, it is not. Danny Rodriguez wrote: It's great. I browse your work now and then to remind myself that haze.is.good. Feb 28 11 06:17 pm Link Natalia_Taffarel wrote: Aye aye! Feb 28 11 06:22 pm Link Brian T Rickey wrote: Jaime is a really awesome dude. I asked him for a critique on an image once via Deviant art, and he sent me his phone number and said to call him. He then talked my ear off for three hours about everything I could ever want to know. And yes, he rarely uses flash. Feb 28 11 06:30 pm Link My little experiment on one of my old images:  Original:  Mar 01 11 07:33 pm Link I know it's probably not to the quality of your guys' work, but here's my try at this. Either way thanks to all you guys for the advice. It was quite helpful to me and I'll continue to practice.  Mar 02 11 09:24 pm Link THis is just a try out of my friends 5d with a 16-35mm lens. He has access to this beauty at school and I did some quick shots of my friend Ylsa. She is not a model what so ever but likes to play the role a lot.  Mar 29 11 07:29 pm Link looks great Danny Mar 29 11 08:20 pm Link |


