|
Forums >
Digital Art and Retouching >
How to make eyes "pop"
What techniques do you use to make a model's eyes pop? Aug 04 09 05:07 pm Link Stephanie5482 wrote: I usually stick them with a pin or needle. Aug 04 09 05:09 pm Link You focus your lens on the eyes with a larger f stop 10 or greater if you can. Aug 04 09 05:10 pm Link Good Egg Productions wrote: haha ewww. Aug 04 09 05:10 pm Link Good Egg Productions wrote: LOL too funny. Aug 04 09 05:11 pm Link Light them right in the first place. Aug 04 09 05:11 pm Link A good sharp focus on the eyes, good lighting in the eyes, and good photoshop for the eyes including but not limited to.... highlights, colour correction, selective sharpening and dodging and burning. Aug 04 09 05:11 pm Link Images of Light wrote: this would make the whole photo extremely sharp, if just the eyes are required to be sharp any f stop should work as long as the focus is accurate. Aug 04 09 05:12 pm Link What I usually do is duplicate the background layer, then do Filter>Sharpen>Unsharp Mask, and set the sliders for the amount of sharpness I want. Then I'll create a layer mask, invert it, and paint white over the eyes with a soft usually 50-75% opacity brush. It gives a great subtle pop and brings attention to the eyes, I also sometimes do this to draw attention to other places of the face, lips, hair etc. Aug 04 09 05:13 pm Link Aug 04 09 05:13 pm Link Stephanie5482 wrote: I dupe the layer, then select the whites, modify (feather by 10 pixels) add a layer mask and screen them around 10-12, maybe 15 opacity. Aug 04 09 05:14 pm Link Select the eyes with the pen tool (or other selection tool) Turn into a selection make a new layer Pull a curve on the new layer only (brighten slightly). Erase effect on iris&pupil if you wish. Eyes will pop. Aug 04 09 05:15 pm Link Images of Light wrote: Why would you say that? I have never heard of such a thing. Please explain the logic. Aug 04 09 05:16 pm Link Stacy Leigh wrote: Same reason that they would answer that way in a retouching forum... Aug 04 09 05:18 pm Link You guys are really really smart and have all these cool ways of doing it that involve a bunch of different steps. I'm impressed. I simply selectively sharpen using layer masks. Aug 04 09 05:24 pm Link Dodge & Burn tools.... Selective Contrast.... a tiny amount of High Pass Filter if needed.... No additional sharpening... the Hassy is sharp enough already & I really dont care for over sharpened eyes & soft/plastic skin ... it looks tacky/cheesy to me ;D LOL! Aug 04 09 05:30 pm Link Anna Slater Editing wrote: thank you! This achieved exactly what I was looking for. Aug 04 09 05:36 pm Link select eyes and control its histogram separately by using level. turn up the contrast using level, then duplicate layer. Blend the new layer using "soft light" option. If it looks to weird, then tune down the saturation a bit. Aug 04 09 05:39 pm Link Paul Byun wrote: How does one change contrast (alone) with the Levels tool? I'm curious how you're going about it. Aug 04 09 05:51 pm Link Make up artistry should rank very high in this discussion, but it starts with lighting. Make no mistake about it, it's lighting the eyes. I feel the eyes are the most important thing in photographing beauty and portrait. There are several techniques and several photoshop techniques. However, sometimes it's certain eyes that pop in general. Blue or gray eyes will spark in both color and black and white. They will really pop in black and white. Dark brown eyes are very hard to pop no matter what and usually take some post work to make them stand out more. Some lighting techniques involving reflectors such as a belly pan technique will make eyes pop. An over and under lighting design can also pop the eyes. Even lighting going directly in the eyes can also put some punch in there and minimize any shadowing. Aug 04 09 06:12 pm Link Usually all eyes need (on full length shots) is a little whitening to really bring them out. I take the magic wand or lasso to select the sclera, feather it a bit, and use curves to bring up the brightness. Sometimes I'll also bring down the saturation a bit to cut down on red veins or an off-white tinge. I also use this technique on teeth, but I'll also color correct by adding blue to fix yellowing. Aug 07 09 11:12 am Link If you're asking about how to make them pop with retouching & not in the actual shoot... I use Paint Shop - don't know what you use but; Use a freehand selector and and outline the eye. Then I get into the effects, and click on "Time Machine" - and go for 1960's this will whiten the eye whites, and brighten the eye color. =] Aug 09 09 07:05 am Link double post.. Aug 09 09 07:13 am Link Grant-Thomas wrote: Aug 09 09 07:13 am Link
Post hidden on Aug 09, 2009 11:33 am
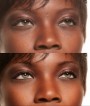
Reason: violates rules Comments: No BS Aug 09 09 07:17 am Link Myself I'll dodge at about 10% just brighten the whites a bit. And then dodge the iris slightly, but just the inside part of it to make a darker 'ring' around the outside. Then burn the lashes slightly. If there's lots of red in the eye, I'll lasso the whites, go to hue/saturation, remove the red channel - to make the red go grey, then brighten slightly and patch tool the grey lines away. Then finally maybe tweak the saturation Aug 09 09 07:19 am Link Jag Fotoz wrote: Not true. This is from my other port and was shot at 2.8 Aug 09 09 07:52 am Link Here are several elements that are helpful for the eyes to pop: 1. The eyes Must have a catch light...without a visible catch light the eyes are dull and lifeless. There is No Sparkle or light or brightness in the eyes without a catch light. 2. The irises should have "some lightness and texture" to them. Dark eyes need a little "iris lightening" to bring the really brown or black eyes "up" so we can see some lightness and texture details in the irises. Its pretty hard to have a captivating relationship with eyes that look like black balls of coal...its great for an unintentional moody shot...but not if you dont have to. 3. The viewers eye is always attracted to the lighter or more sharp parts of the image...so to the degree that you can add a bit of lightness and sharpness to the eye area...your viewer will be attracted back to them. 4. The ole "Hollywood Eye" used to be a bit larger than natural life...just by a very small amount...you dont need much to make the eyes stand out this way...and to be a very captivating part of the image. People with slightly naturally larger eyes or irises are often perceived as more sexy, intense or interesting according to viewer eye movement studies. 5. If the eyes can be placed at positions 1 or 3 on the top part of the "rule of thirds"...most people would grant additional attention to objects in those areas. So if you photographically plan for the image to be captured that way...then your eyes are always going to be placed at those strong focal points. Anything placed at those points is immediately granted a focal point status. Just some general ideas. Ray Aug 10 09 04:30 pm Link What I love about Adobe products (and Photoshop in general) is that there are 1,000 ways to do something and none of them are right or wrong... (Just some ways are more efficient than others...) In order for this technique to be successful, like TMA says, (and a bunch of others before), the eyes have to be properly lit. If the eyes are not lit properly, it will not look right. Also do not "fake" the catchlights like some retouchers do. If you're going to fake the catchlights, you will have to "fake" the "light" as well (and that is another lesson of "painting light" into the photograph to compensate for the fake catchlights that have been added. (so that means you have to understand the kind of catchlights you put into the eye and how that light shines on the model, etc.) I am going to give a step by step approach at how I do eyes (and I haven't seen it listed here) and I am quite sure a lot of you will go "OH NO!!!!!" but it is a tried and true method taught to me. To brighten the eye I use a Curves layer and drag the indicator line upward until the entire photo is "brighter" set the blending mode to Screen. I then invert the mask (Cmd I or Ctrl I). With a soft white brush (opacity 100, flow 20) I brush out the ENTIRE eye. It will look hideous and that is totally okay... I then reduce the layer's opacity to 20. Next I place a blank layer and with a HARD white brush (opacity 100 flow 20) I brush in the "refractor" light. That is the light that is opposite of the catch light. Usually at the 6 oclock point of the placement of the catchlight... In order for this to be done successfully, you will have to follow the "light" of the photograph. It is usually the shape of a crescent moon right around the lower opposite side of the iris. Be generous with it and THAT will look hideous and that is okay. The go to Filter/Blur/Gaussian blur and with your eye "soften" the cresent until it is an acceptable blend. For blue, gray, Caucasian green eyes, I normally use the softlight blending mode, for hazel, any shade of brown and African American green eyes I use the blending mode of Overlay. Do each eye separately. If it is too much refraction in the eye, lower the opacity of the layer to taste. For punch of the iris, I use a blank layer and with a soft BLACK brush (opacity 100, flow 10) i go around the rim of the iris to give it some depth and sometimes I follow along the irises "flair/flecks" line to give dimension, and I also darken the pupil. If it is too much on the eye, lower the opacity to taste. Lastly, I place another blank layer and with a hard BLACK brush (opacity 100, flow 1), i go over the eyelashes and eye line like an eyeliner pencil)... See results below. FOR THE RECORD, THIS WILL NOT LOOK GOOD WITH COLOR CONTACTS!   Aug 12 09 05:16 pm Link Dallas J. Logan wrote: beautiful work!! gorgeous! Aug 12 09 05:41 pm Link Not that anybody asked, but here is my penny worth of an opinion... I use a curves layer (bringing up the middle of the curve by about 5 or so) with a mask- fill it in 100% black, and then paint out the eyes to reveal the lighter whites... then I tweek the opacity of the layer. sometimes I will clean up a few blood vessels... So simple and easy it takes one minute or less.  Stacy Leigh Aug 12 09 07:41 pm Link I decided to resurrect this account. Aug 13 09 09:19 am Link I'm using this -copy eyes in new layer -increase bright and/or contrast -change layer to vivid light or other - changing color balance if i need diferent color - sharpen Aug 13 09 09:58 am Link
Post hidden on Aug 13, 2009 10:43 am
Reason: violates rules Comments: No BS Aug 13 09 10:22 am Link Stacy Leigh wrote: I do that a lot, with some sharpening at low radius. or maybe some dodge and burning, and selective sharpening/color if the eyes are already nice and clear. Aug 13 09 10:30 am Link i'm lazy. i use a couple kubota actions. but some colors of eyes seem to be able to pop more than others. i read something about having the room lights up during a shoot because the eyes will look better that way. Aug 13 09 10:30 am Link
Post hidden on Aug 13, 2009 11:42 am
Reason: swearing not needed Comments: You're trying to derail. Stop. Aug 13 09 10:56 am Link oh dear - em.......which one do I describe? ok the basic is dodge and burn on grey overlay layer as your actually not damaging the eye. Then new layer and "paint" in colour if needed, or use Variations making sure ya mask out the eyes, or actions, or colour balance....yeah I know very scientific and great workflow but each eye is different like each model and therefore should be treated accordingly. Plus I love maniping eyes so I have a odd way to edit them anyway..... and this is absolutely no use to anyone!  *sigh* *sigh*Aug 13 09 12:48 pm Link I dodge the iris and then burn the outter ring of the iris. If its necessary, I'll also darken the pupil, add eye liner/fix eye liner, and maybe add eye lashes. MAYBE add another catch light Aug 13 09 01:26 pm Link I wish I knew what Colin's posts were... I am all sorts of curious of what he could have possibly said that was bad enough to have it removed. oh well, S Aug 13 09 01:31 pm Link |