|
Forums >
Digital Art and Retouching >
Putting a water dress on a model
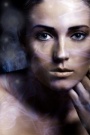
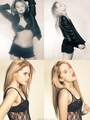
I'm trying to put a dress made of water on a model, and am really struggling. This is essentially the image I'm trying to replicate:  I was just wondering whether anyone has done anything like this before... I'm just trying to make a realistic skirt. I'm not trying to put in all the auxillary splashes yet. I'm getting frustrated at my lack of results, and am just about ready to just photoshop some tigers in and call it a day  Jun 25 09 05:49 am Link Jun 25 09 06:04 am Link I wish I could address the issue with an answer pertaining to Photoshop but unfortunately my knowledge isn't quite up to par. For that I apologize however, I can point you to an individual who specializes in such dresses. I believe he uses a 3D program to render the dresses but he may be able to help. His name is Bijan of Bijan Studio and Fantasy Wardrobes (mm # 887787). Good luck.   Jun 25 09 06:06 am Link Ruben Vasquez wrote: Thankyou so much - that's incredibly helpful. I'm making meshes in a fluid simulation program, and rendering them on a backplate in 3dsmax using mental ray. I didn't want to specify the method I was using in my initial post, because I wanted to leave it open for other people to suggest better methods. Those images are incredible. Jun 25 09 06:09 am Link Davepit wrote: lol I don't have a damn clue what the hell you just said but it sounded cool! Jun 25 09 06:23 am Link Davepit wrote: The water dresses I've seen (like Giselle in the op) took a rumored 10,000 frames over the course of two days, picking the absolute best shapes, and editing them. Another tutorial I read included a wading pool set against a black background.. kick light from both sides, and an assistant throwing bricks and other objects into it to get hundreds or thousands of shapes, then editing with those. Jun 25 09 06:45 am Link I can't see a 3d renedered water to look like real water, throw couple of buckets of water into the air behind a black background, some lights fast shutter speed and you'll have more than enough images to make your dress. Use warp tool to manipulate water into your desired shape. Jun 25 09 09:31 am Link Davepit wrote: If you are artistically inclined and know how to paint in PS it will be a piece of cake. If not Pay a PS artist to do a few of them on a transparent layer then just pose the model accordingly and past it over the picture. You can always Free Transform or use the liquify tool to adjust. Jun 25 09 09:39 am Link Tarazz wrote: Great! you posted this while I was writing. Jun 25 09 09:40 am Link Tarazz wrote: depending on the software used, I think 3d water could look BETTER than real H2O. I dunno.. it may be more time consuming, but it seems like you'd have much more control over the final product. Use the shot of the model as a 2d background, and 3d model a transparent shape roughly similar to that of your photographed model. Then throw 3d water on the transparent shape. Doing this, you'd get the distorted reflections and refractions of your model and the set in each water drop. Jun 25 09 09:52 am Link http://www.youtube.com/watch?v=IIgumws-CJw This is 3d water. It was written in maya then sent to houdini and then composited. The thing is, because its moving the detail didn't need to be so fine. I communicated with the person who supervised the 3d work for the commercial. Unfortunately I know nothing about writing fluid force stuff in maya, so may have to stick with what I've been doing with realflow and 3dsmax. Realflow tends to be a bit tempramental and trial-and-error based, though, so it's frustrating me. I figure that if I can get a model like Hana, people won't be too critical of my 3d work, butfor the moment, this is my plan B. Im almost certain that this commercial and the one I posted are the only two examples of this idea in advertising. Jun 25 09 10:38 am Link Tarazz wrote: Well that's a great idea. Jun 25 09 11:43 am Link There is an excellent video and tutorial on this, but I am having a hard time finding it. I'll look again later today. This tutorial shows up a lot on other boards, but IMO is not a very good example... still, it may give you enough ideas to get started on your own. http://bwebi.com/water-dress.html Edit: Here's Bijan Studio's thread discussing how he does it: https://www.modelmayhem.com/po.php?thread_id=296704 Jun 25 09 11:51 am Link Davepit wrote: If you can figure out how to find it via google, Bijan put a whole tutorial on how to do it up on here about a year ago... Jun 25 09 11:53 am Link Have I mentioned how much you guys rock? Thanks so much  Jun 25 09 05:52 pm Link Davepit wrote: I was going to say "I'm sure its CGI renders" but you already know that. Jun 25 09 06:35 pm Link . An easier and quicker way is to photograph the model for the finished image. Then, photograph the model in as close to that pose as possible -- against a green screen -- wearing a green, hooded, body suit and a suitable dress (blown with a fan). Chromakey (a broadcast television term but reasoably suitable here to convey understanding) the dress and render it as water. Add water splashes and drops. There is no reason to go 3D -- stay within 2D as it is much easier and faster as well as just as realistic in appearance. . Jun 25 09 06:54 pm Link RSM-images wrote: No. You won't get the same refraction and reflections of her skin behind the water. Jun 25 09 06:57 pm Link syd47421 wrote: It's all about who you use as your visual effects person is Jun 25 09 07:03 pm Link . iHartPhotos wrote: . Jun 25 09 07:06 pm Link Jason Todd Ipson wrote: was it this one http://www.tutorialkit.com/tutorials/Wa … 42866.html Jun 25 09 07:15 pm Link Davepit wrote: These may or may not help, but I found them interesting... Jun 25 09 07:34 pm Link Thanks for the links guys. I had always dismissed the idea of using superimposed water, as opposed to water rendered over a back plate, as infeasible, on the basis that it wouldn' account for the refractions. However, in light of the information about the creation of the Bundechen ad, and after looking over some emails with the guy who did the Mattoni ad, it seems that refractions wouldn't actually be that much of a problem! I guess I had just associated the technique with the quality of the results achieved by that tutorial with the girl in the bikini. Stephen, looking at the facebook pictures, my first thought was 'Hmm, which MM model wouldn't mind having paint thrown on her for a few thousand frames?' then I realised it was a mannequin  I guess since I'm not actually animating the thing, shooting water separately, instead of simulating it in realflow, as I have been doing, might just work! Jun 25 09 07:39 pm Link http://www.nextlimit.com/realflow/te_videos.htm also try that. Stephen Eastwood http://www.PhotographersPortfolio.com Jun 25 09 07:40 pm Link Jun 25 09 07:51 pm Link I posted about the milk project before- http://razooma.net/projects/milk/  Constantin mentioned Hmm.. So went hastily through comments to Andrey Razoomovsky's profile and works on photosight.ru. In the comments to some pics, he (himself) claims it's just regular Milk (3.5% fat) + "just a bit" of photoshop + a lot and a lot and a lot of frames until he gets one right (but a that point, I'm more tempted to think that a lot of frames are made into one composite picture)... Makes perfect sense, gonna do a proof of concept shot soon I guess... quite interesting Jun 25 09 08:07 pm Link I'm giving a try to RealFlow, it looks aresome  Jun 25 09 08:49 pm Link They're all very cool IMAGES, but I'll be impressed in terms of PHOTOGRAPHY when someone can do it single exposure through the lens. Maybe Adam Chilson will do it someday, but then again he's usually too busy coming up with his own insanities. Jun 25 09 08:57 pm Link wynnesome wrote: Perhaps. It certainly is one valid approach. Jun 26 09 12:17 am Link Thanks again guys! I think that the wealth of information and genrous spirit in this thread more than makes up for the Soapbox forum on this site! The method of shooting hundreds of frames in the sunlight is very interesting indeed. I'm going to give that a shot when I head to Sydney. I will, however, modify it somewhat, in that I will shoot the frames with lighting similar to that which I will use for the model, via a few flashes. Hopefully that will both freeze the water well, and allow a realistic result. Jun 26 09 06:23 am Link Ruben Vasquez wrote: 3d rendering Jun 26 09 06:48 am Link StephenEastwood wrote: The color shift on her skin under the water kind of kills that image for me. Jun 26 09 08:11 am Link I glad this thread came up. I saw this photo: http://razoomanet.deviantart.com/art/Mi … -123205178 and because very intrigued by it. I really like this style. Jun 26 09 08:45 am Link I attempted it, with unsatisfying results. I took few hundred pictures of splashing water, used color range to crop out the water from the background and layered most of it.  Jul 11 09 10:04 am Link Dude its simple Get a garden hose. Have a friend hose down your naked model while you click the shutter. Jul 11 09 10:10 am Link I just purchased 140+ "Water Splash" paint brushes for Photoshop CS-CS4 at www.daz3d.com. They are 1/2 price till the end of July 2009 it seems. These splashes look real and come in all kind of shapes, sizes and patterns and can be further warped into other shapes and curves and spins if needed for the effect. Look for "Rons Splashes" on the site. They load right into the Photoshop Brushes Pallet and you can just paint them onto an image...and if you use a separate transparent layer for each splash...then they can be manipulated freely to overlap and to extend into any direction you want. http://www.daz3d.com/i.x/search/searchs … g=splashes Jul 12 09 08:32 pm Link Hello, I get this questions a lot, I should do a video online in youtube.com on how I achieve the results in my final images. I photographed the model first in a very simple fashion style gray backdrop. Actually it is real water. I had an assistant put water in a bucket, empty 2 litter soda bottle anything we could create different splashes with into my set and me taking the shot and freezing the water in motion. I took about 300 different shots. The splash images were warped into a dress like shape. It took me at least 3 to 5 days in PS per image to create the finals. I tried to shoot the splashes in black background, white background, gray background and it would not work. Till I thought in black and white and shot the splashing water in a red background. After turning that shot in gray scale and putting my splash shot into my model image and applying the blending Hard Light to the splash image it blended perfectly, maybe with a small tweak with a curve to get rid off any unwanted edges. I did try to get a 3D artist involved but the water just did not look photo realistic, so I went with doing it all in photography and PS to fine tune. Juan Zambrano Nov 21 09 07:56 am Link One thing that I see a lot with composite images is the lack of attention to relative resolution as well as relative proportion when it comes to the elements. If you are going to suspend the disbelief of the viewing audience I personally think that attention to detail is crucial. As an example, if you have a high resolution image of a well lit model covered in low resolution, over-sized water droplets that is a dead giveaway that it is not real. If you are going to try to do something like that solely in photoshop I personally say take your time and do it right. To get it right, I would say first make note of the lighting setup for the shot image (if all of the elements are from the same lighting, even better) and on a new layer, draw arrows representing all directions of light. On another layer I would sketch out over the model the shape of the dress I want to create out of the water, taking note as to the movement of the model's body, the movement of the air around her (is her hair being blown by a wind machine), etc... to get a believable sketch. Then would be the arduous task of molding the shape out of the water splashes (done in layers of course for overlap) followed by finalizing highlights on the water to match the light setup. But that might just be me... HEY, 1st POST! YAY. Nov 22 09 05:05 am Link Well this has given me some ideas to try out my self and not use photoshop ..very interesting Nov 22 09 05:17 am Link I did one that's in my port. I shot the model and picked the pose to use. For the water I went out back on a sunny day with a black nylon backdrop and shot water being splashed out of a 25 gallon tub, water being thrown from a bucket through the air and water splashing off a various shapes that were very close to the models pose. Make sure the objects are painted black. All of this was done with a shutter speed of 1/2000 to freeze the motion. Set the camera on continuous shooting and just hold down the shutter button while the water flies. Out of 15 shots or so you'll get maybe one that you can use for something. In photoshop, select sections of the splashes and water streams that approximate the flow patern and shape you want, Lasso the area of the image you want to use (might not be the whole image) and paste it into the models' image. Scale and distort to match what you want, don't get too carried away with it. Set the blending mode to screen, the black background will disapear against the brighter parts of the image, so it's important to light your subject and background accordingly. Use masks to blend the sections together. For areas you want more detail than shows through with the screen mode, duplicate the layer, set to normal and then use a hide all mask to then go back and gradually paint in the areas you want to bring up detail in. hope that all makes some sense and helps. Nov 23 09 08:30 pm Link |


